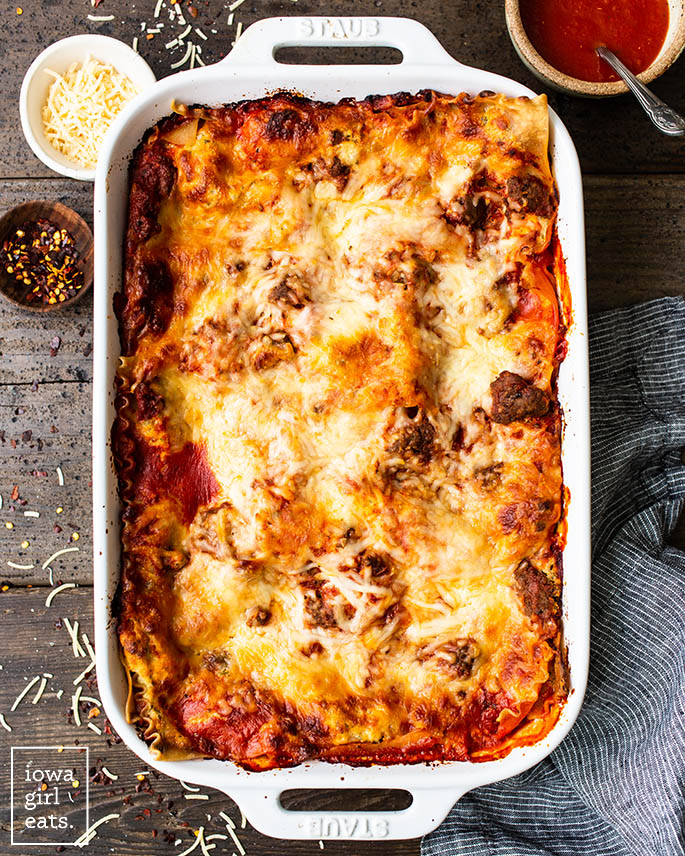
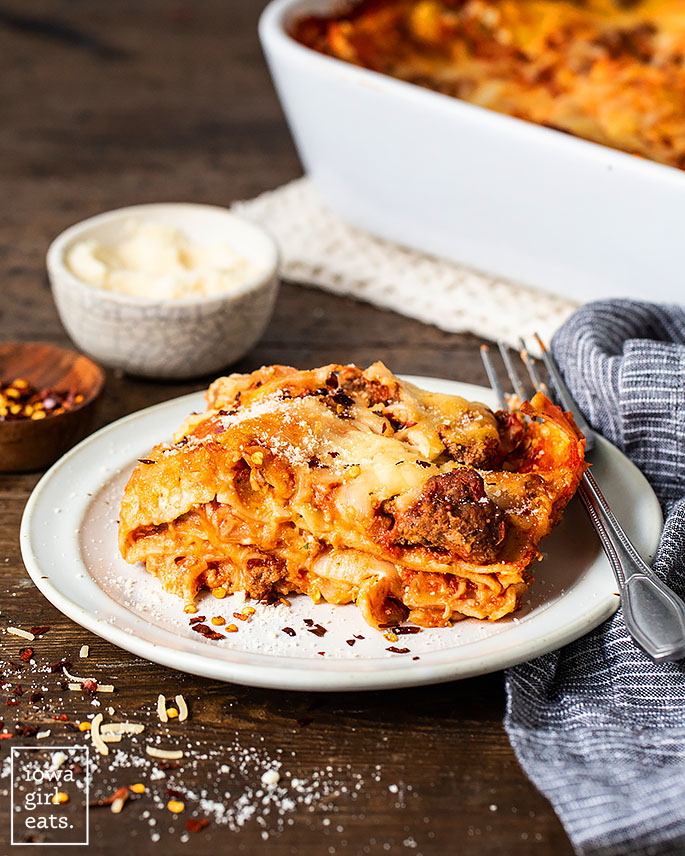
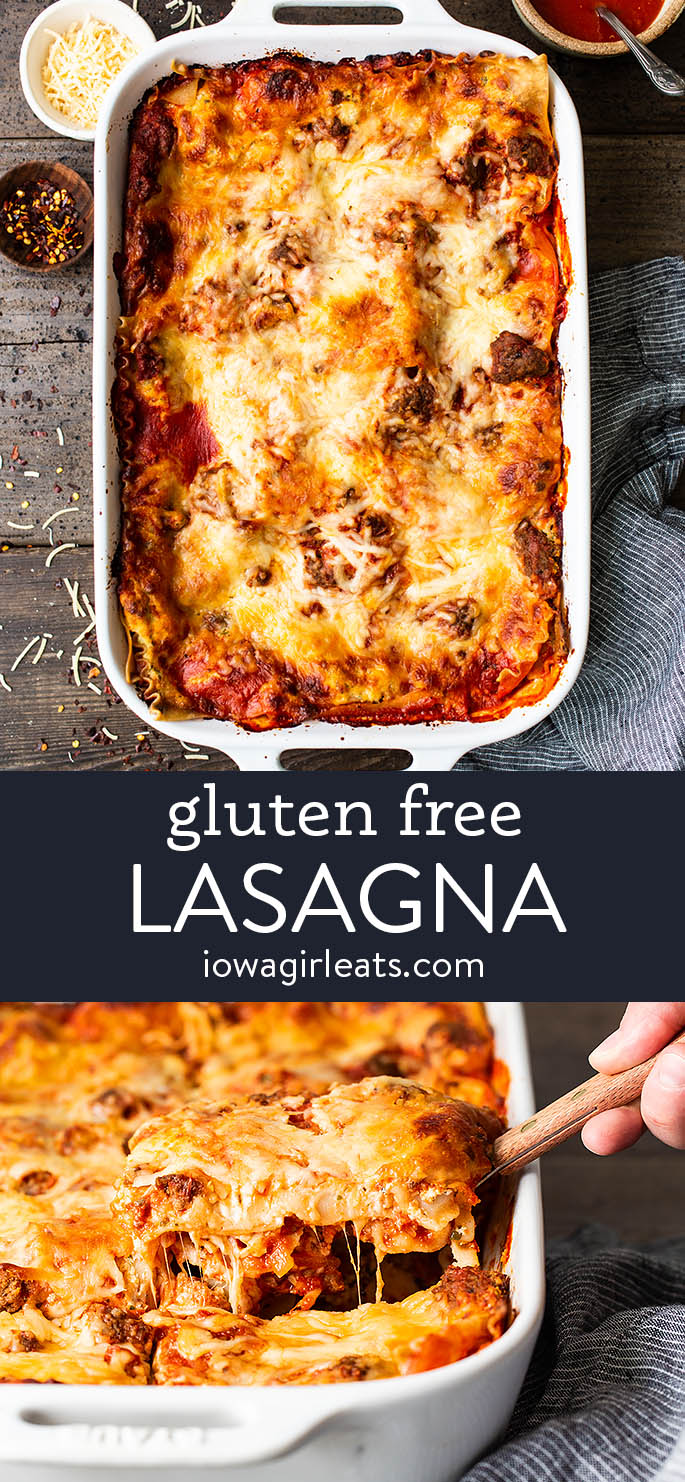
Gluten Free Lasagna tastes just like the real thing! Hearty, cheesy, classic comfort food made with gluten free lasagna noodles.
“Best lasagna in my 63 years, made it exactly as written except used the La Veneziane no boil lasagna noodles. Fabulous!”
The first time I ate gluten free lasagna after being diagnosed with Celiac Disease, I knew that everything was going to be OK. It’d been years since my last hot and cheesy scoop, and I felt like someone who’d just been handed a jug full of water after wandering through the desert for days. I could practically feel the powerful combination of cheese, meat, noodles, and sauce coursing through my veins.
Who me, dramatic?!
Seriously though, if living gluten free and being able to eat lasagna can coincide – there’s not much to complain about in life. Especially when it’s made from a handful of everyday ingredients and tastes just like the real thing.
This recipe is SUCH a treat!
How to Make Lasagna Gluten Free
I’m going to let you in on the #1 secret for making lasagna gluten free: use gluten free lasagna noodles. That’s the only swap I made in my family’s go-to lasagna recipe to make this classic comfort food gluten free.
This may seem like a “duh” statement, but gluten free lasagna noodles didn’t start showing up in my local grocery stores until just a few years ago. Luckily gluten-free pasta is now readily available, plus there’s several varieties of GF lasagna noodles to choose from.
That said…
My Favorite Gluten Free Lasagna Noodles
I’ll start with my favorite gluten-free lasagna noodle on the market, which I use and show in this recipe, plus provide a few other options for making gluten free lasagna:
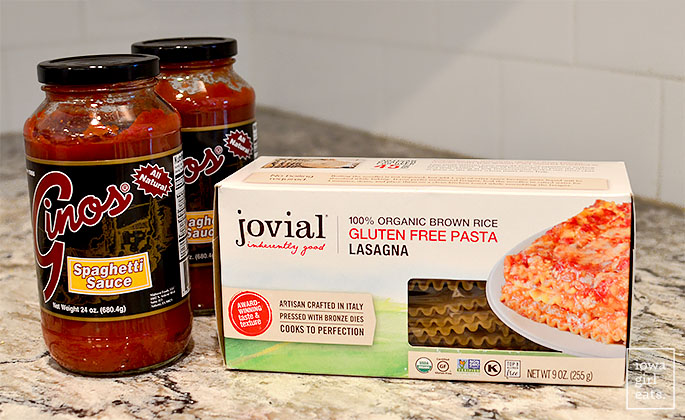
- Brown Rice Lasagna Noodles: I like Jovial Gluten Free Brown Rice Lasagna Noodles. They’re hearty, have a nice chew, and hold up well to being parboiled then baked.
- No-Boil/Oven-Ready Noodles: For the first gluten free lasagna I made and referenced above, I used Barilla Gluten Free Oven Ready Lasagna Noodles. It was a fantastic lasagna. The second time I used them, my lasagna came out half cooked – some of the noodles were hard, while others were soft. This was also the case with the third (and last) time I used them. Personally, I feel no boil lasagna noodles yield inconsistent results.
- Fresh Lasagna Sheets: Like Taste Republic’s Fresh Gluten Free Lasagna Sheets are divine. That said, fresh gluten free pasta can be expensive and might not be something you’d be able to choose every time you make GF lasagna!
Overall I recommend Jovial’s Brown Rice Gluten Free Lasagna Noodles in my gluten-free lasagna recipe for the most consistent results, and best texture. You will parboil them first (meaning, boil them until they’re partially cooked) before layering into the lasagna.
Ingredients Needed
For the Meat Sauce Layer:
- Ground beef: Lean ground beef is recommended, but you can use whatever you have on hand.
- Onion or shallot + garlic
- Gluten free marinara sauce: I love Gino’s (local brand), Bove’s, and Rao’s in this recipe.
For the Ricotta Cheese Layer:
- Ricotta cheese: I prefer full fat ricotta for a rich, smooth, and creamy cheese layer.
- Freshly grated parmesan cheese
- Seasonings and herbs: Dried parsley flakes, pepper, and salt flavor the cheese layer.
Remaining Ingredients:
- Gluten free lasagna noodles: as discussed above!
- Shredded mozzarella cheese
Gluten Free Lasagna Assembly Overview
I’ll share step by step instructions below on how to make my easy gluten-free lasagna, but here’s a quick overview:
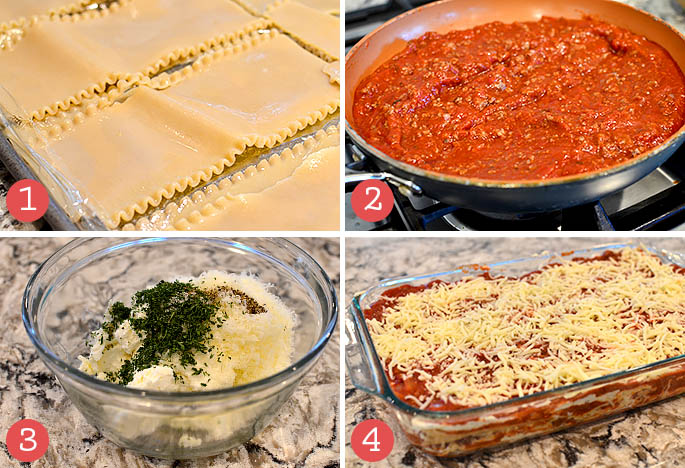
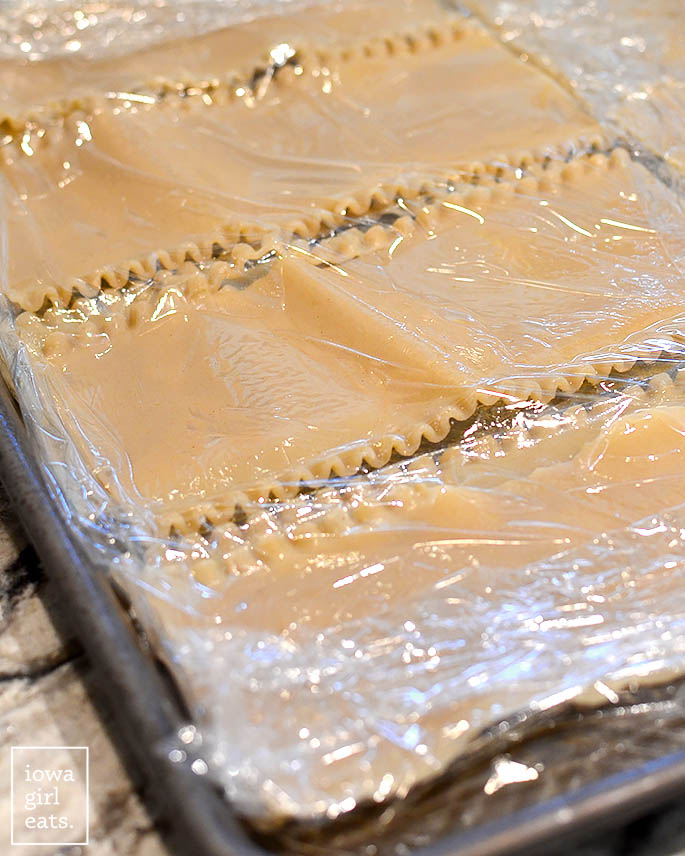
- Step 1: Prepare the gluten free noodles by parboiling, draining, then rinsing them under cold water. Layer the noodles between pieces of saran wrap on a baking sheet then set aside.
- Step 2: Make the meat sauce mixture by browning ground beef then mixing it with jarred marinara or spaghetti sauce.
- Step 3: Stir together the ricotta + parmesan cheese mixture then scoop into a gallon-size Ziplock bag to help layer it onto the noodles.
- Step 4: Layer the ingredients then cover with foil and bake. Remove the foil then continue to bake until browned and bubbly.
Gluten Free Lasagna Variations
Lasagna is one of those dishes that I STRONGLY ADVISE you do not overthink. Picture your Grandma making this recipe in her kitchen. Would she add a little bit of this, or a little bit of that if she felt like it? Absolutely she would! And you should too.
Aside from the gluten free noodles, please feel free to play around with the rest of this recipe to make it your own. Here are some ideas:
- Switch up the meat: Use half ground beef and half Italian sausage to dial up the flavor.
- Add veggies: Add a layer of sauteed vegetables. A combination of mushrooms, spinach, and chopped zucchini sauteed with lots of fresh garlic sounds divine!
- Lower the fat: For a lower-fat lasagna, use part-skim ricotta, and/or mozzarella cheese made with 2% milk. You can also use ground turkey instead of ground beef.
- Switch up the cheese: Not a fan of ricotta? Use the same amount of cottage cheese instead. Drain very well first in a fine mesh sieve.
Whether this is your first or 50th time making gluten free lasagna, I’m confident it will be your best one yet!
How to Make Gluten Free Lasagna
Start by sourcing both gluten free lasagna noodles, and gluten free jarred marinara or spaghetti sauce for the meat sauce.
Again, for lasagna noodles, I use Jovial Brown Rice Gluten Free Lasagna Noodles. For the jarred sauce, we love Gino’s (the spaghetti sauce is less spicy than the marinara — also, this is a local product), Bove’s, and Rao’s.
Step 1: Prepare the Noodles
Follow the directions on the box of lasagna noodles for parboiling them. Jovial brand instructs you to parboil for 4 minutes before draining. That said, the lasagna recipe they provide on their box of noodles differs slightly from mine, so I like to parboil them for 5 minutes.
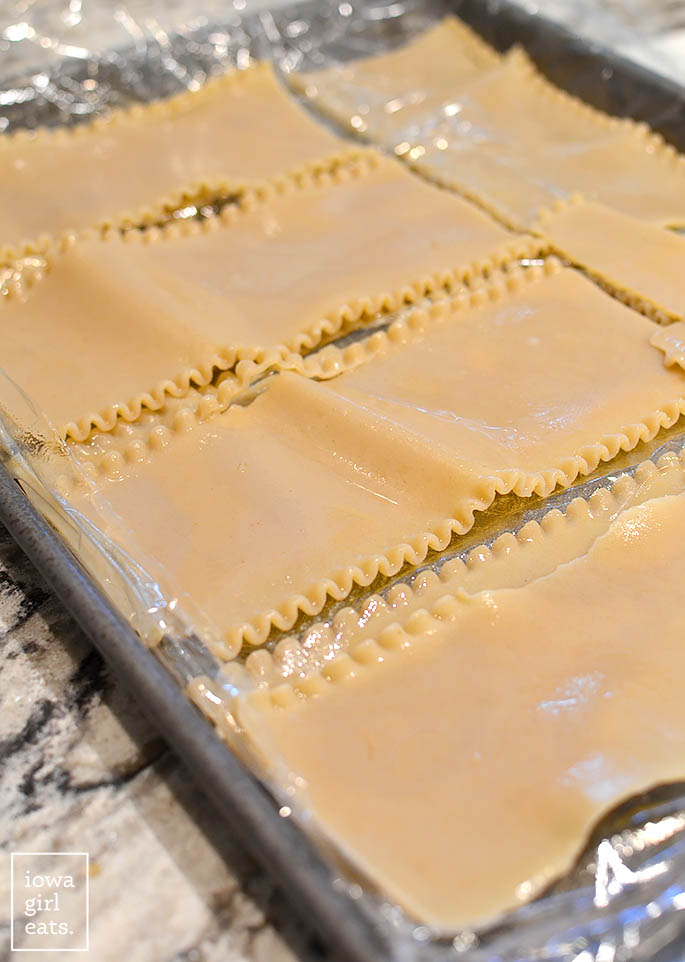
Drain the lasagna noodles, rinse under cold running water until cool, then line them in a single layer on a baking sheet covered with saran warp. Add a piece of saran wrap between layers of noodles so they don’t stick together. Cover the top with saran wrap then set aside.
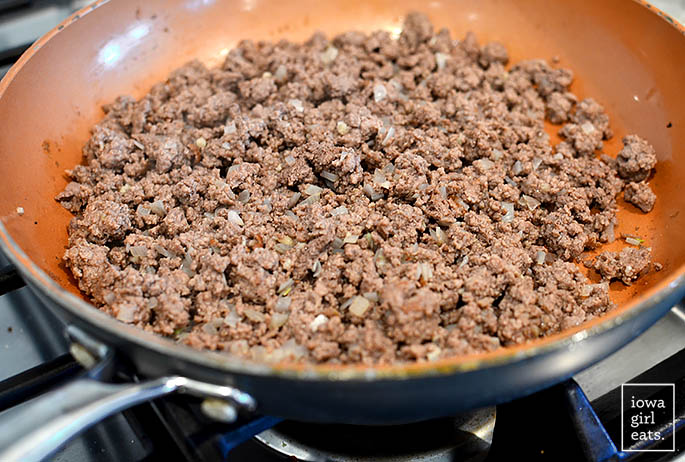
Step 2: Make the Meat Sauce
In a large skillet over medium-high heat, add ground beef, chopped onion or shallot, pressed or minced fresh cloves garlic, salt, and pepper, then brown, breaking the meat up as it cooks. Turn off the heat then drain the beef mixture and return it to the skillet.
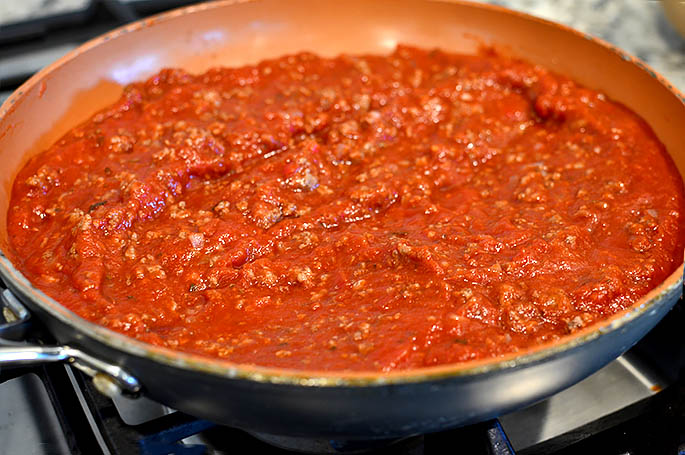
Add jarred, gluten free marinara or spaghetti sauce to the skillet then stir to combine and set aside to cool slightly.
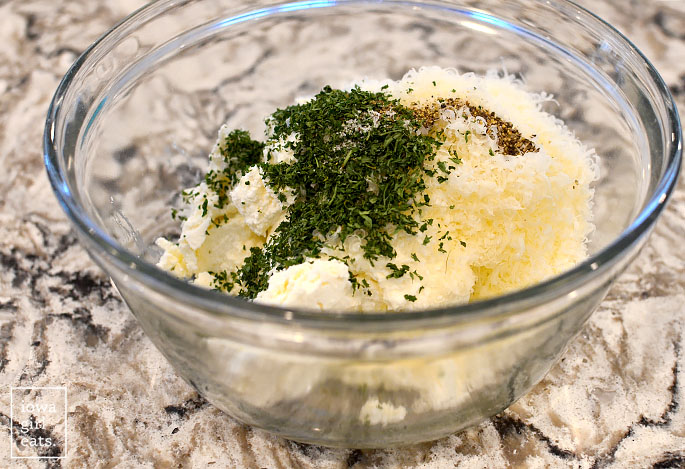
Step 3: Make the Ricotta Cheese Mixture
To a medium-sized mixing bowl, add ricotta cheese, freshly grated parmesan cheese, dried parsley, salt, and pepper, then mix to combine. I like Belgioso brand ricotta cheese.
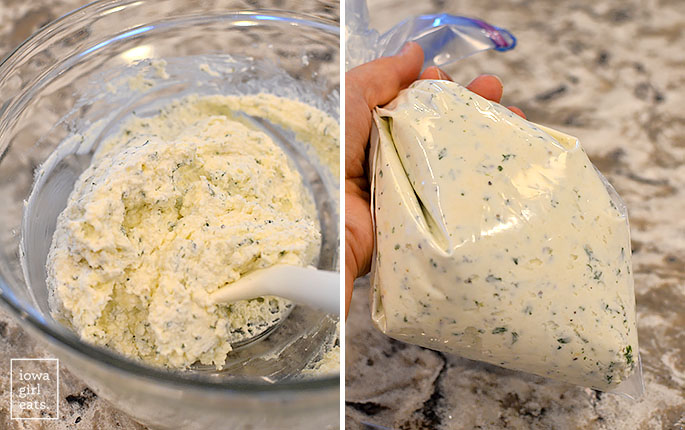
Scoop the mixture into a gallon-size Ziplock bag then squeeze the air out, seal, and snip off one of the corners. This will help you pipe the mixture onto the lasagna noodles before spreading into an even layer.
Step 4: Layer the Lasagna
Spray a 9×13″ baking dish with cooking spray then…
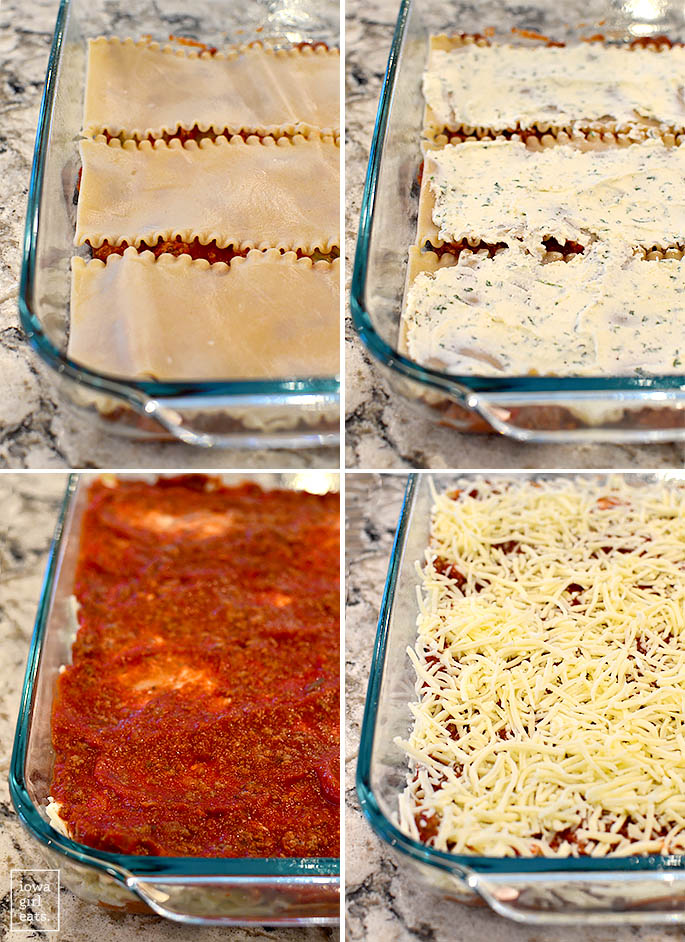
- Spread 3/4 cup meat sauce into the bottom of the baking pan. Don’t worry if it doesn’t fully cover the bottom — we just need a thin layer to prevent the noodles from sticking/burning.
- Layer 3 noodles width-wise across the bottom. I use three noodles for the first layer, and 3 noodles + 1/2 of another noodle sliced in half widthwise for the 2nd and 3rd layers.
- Spread 1/3 of the ricotta mixture across the noodles. Pipe the mixture onto the center of each noodle then use the back of a spoon or an offset spatula to spread into a thin, even layer.
- Spoon 1/3 of the remaining meat sauce mixture over the top. Spread into an even layer.
- Sprinkle shredded mozzarella cheese on top.
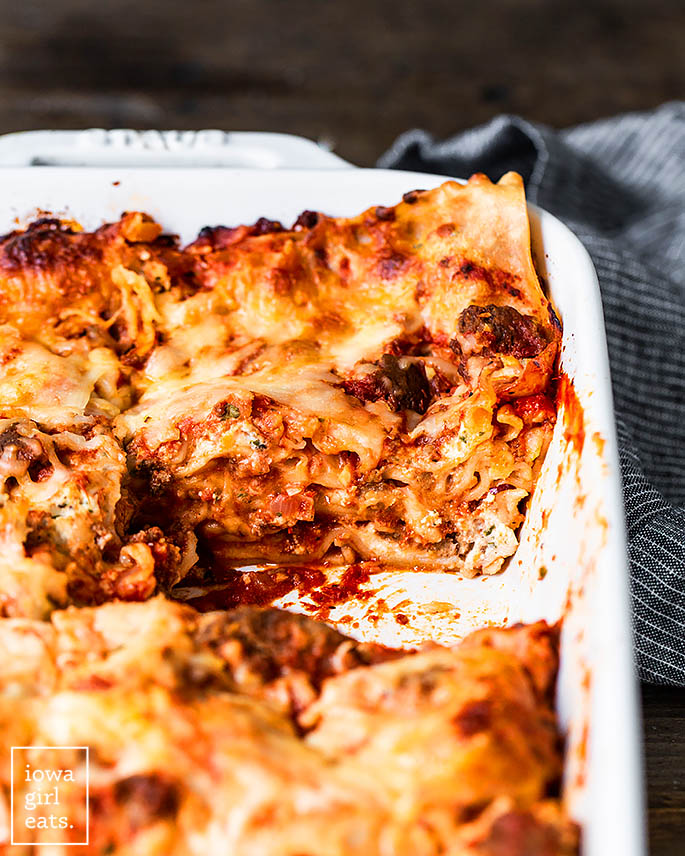
- Repeat the layers — noodles, ricotta cheese mixture, meat sauce, shredded cheese — two more times for a total of three layers.
Boom!

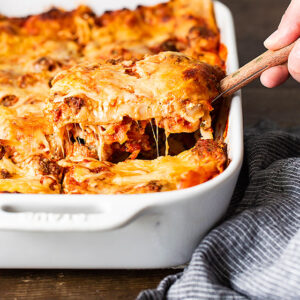
Step 5: Bake
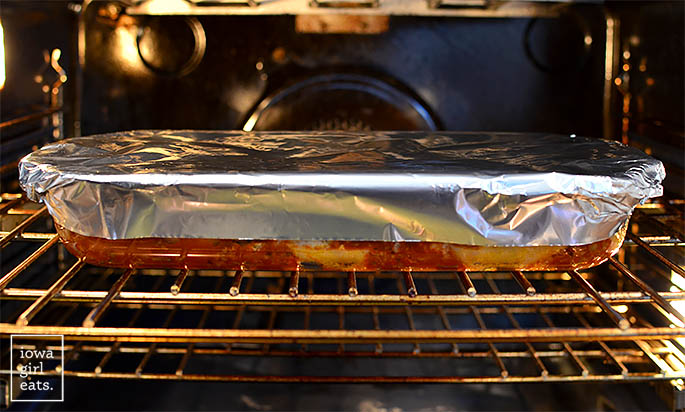
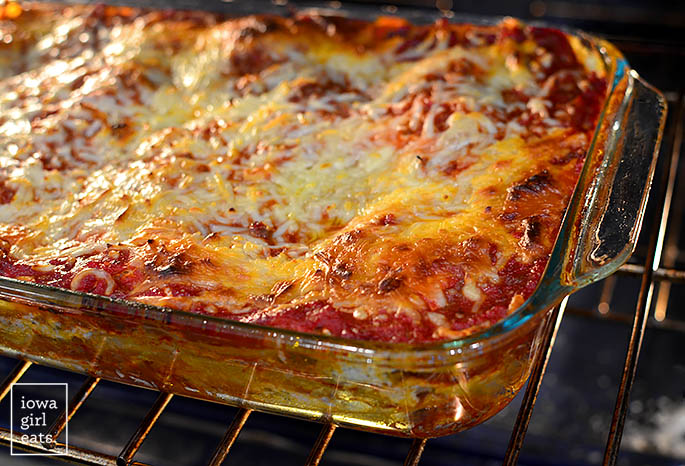
Cover the baking dish with a piece of nonstick sprayed foil then bake the lasagna for 20 minutes at 375 degrees. Remove the foil then continue to bake for another 20-25 minutes, or until the top is deep golden brown, and the sauce is bubbly.
Like this. (DROOL)
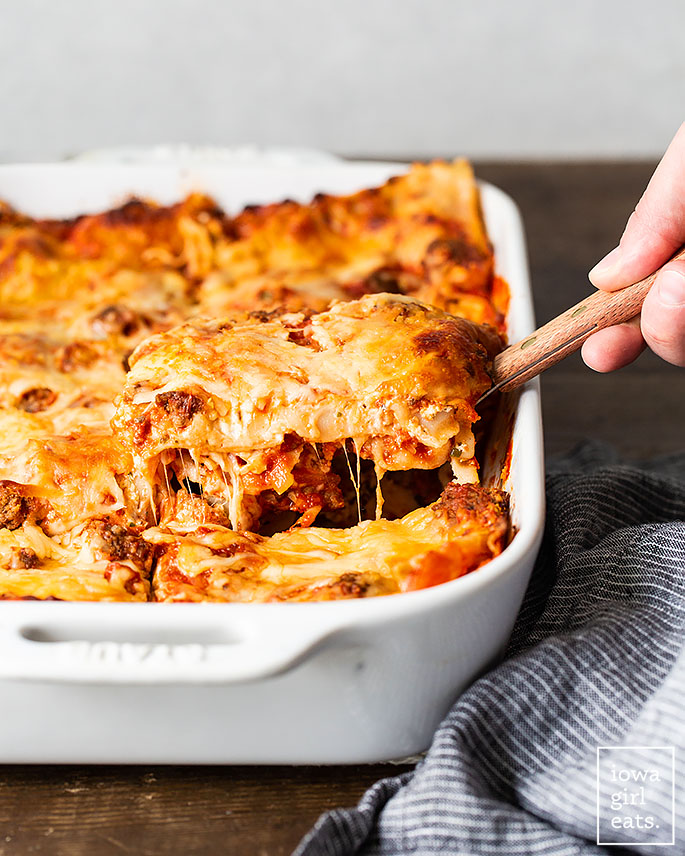
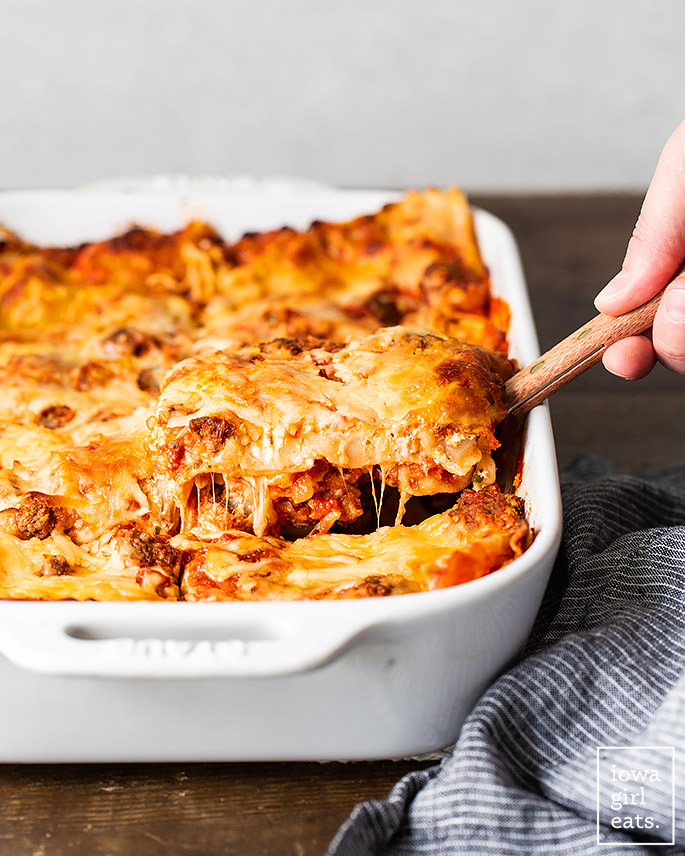
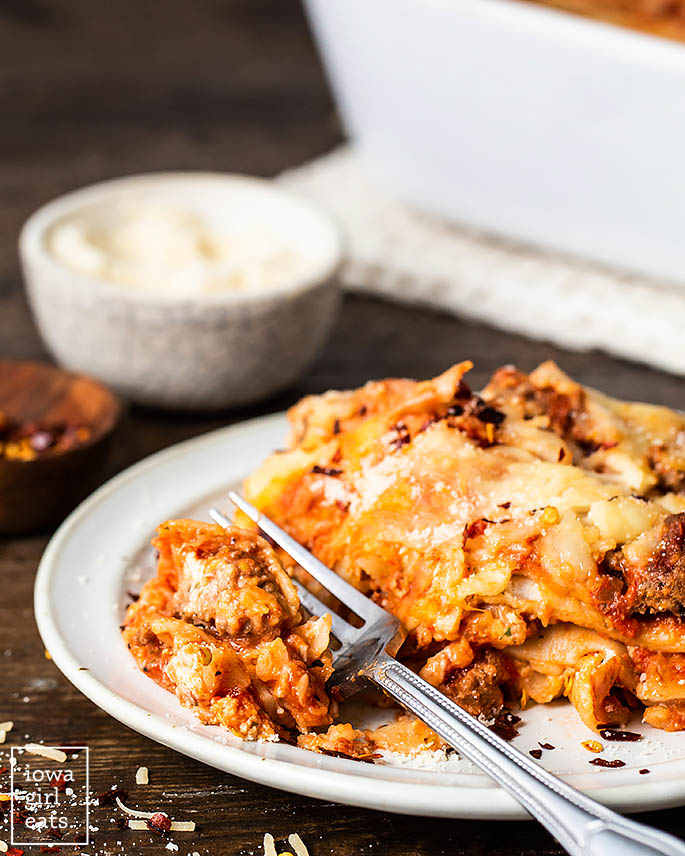
Let the gluten free lasagna rest for at least 15 minutes before slicing into squares with a sharp knife, and scooping onto plates.
This is such a fantastic meal to serve to your family, but we often make lasagna for friends and family who are in a time of need — whether they just had a new baby, have family concerns, or just moved into a new house — the list goes on and on. This dish is such a great way to communicate that you care, and is a truly family favorite.
Gluten Free Lasagna FAQ
How to Store and Reheat Leftovers
Let the leftover lasagna cool then cover and place the entire baking dish in the refrigerator (alternatively you can slice the cooled lasagna into squares then place in an individual-sized, airtight container). Reheat individual-sized portions in the microwave covered with microwave-safe bowl or dish until heated through.
Can I Make the Lasagna Ahead of Time?
As far as individual components, you can make the meat sauce and ricotta cheese mixture up to several days in advance. Save parboiling the noodles for the day you bake it. Alternatively, you can completely assemble the gluten free lasagne up to 24 hours ahead of baking. Take the chill off the baking dish by letting it sit on the counter for 30 minutes before baking, and increase baking time covered with foil by 10 minutes.
Can I Freeze Gluten Free Lasagna?
Let the baked lasagna cool completely then slice into individual-size portions and place in freezer-safe containers. Refrigerate until fully chilled then freeze. Thaw for 24 hours in the fridge then microwave to reheat.
What to Serve with Gluten Free Lasagna
- Air Fryer Asparagus
- Air Fryer Green Beans
- Gluten Free Biscuits
- Garlic Butter Roasted Mushrooms
- Everyday Kale Salad
- Cucumber Tomato Salad
- Gluten Free Focaccia
Equipment
Ingredients
- 10 oz gluten free lasagna noodles, see notes
- 16 oz shredded mozzarella cheese
For the meat layer:
- 1 lb lean ground beef
- 1 small onion or large shallot, chopped
- 2 cloves garlic, pressed or minced
- salt and pepper
- 32 oz gluten free marinara sauce, 4 cups
For the ricotta cheese layer:
- 16 oz ricotta cheese
- 1 cup freshly grated parmesan cheese
- 1 Tablespoon dried parsley flakes
- 1/2 teaspoon pepper
- 1/4 teaspoon salt
Directions
- Preheat oven to 375 degrees. Spray a 9×13” baking dish with nonstick spray then set aside.
For the noodles:
- Line a half sheet pan with saran wrap then set aside.
- Bring a large pot of water to a boil then season with 1 Tablespoon salt and add gluten free lasagna noodles. Parboil according to package directions (for Jovial brand, parboil for 5 minutes), stirring often to prevent sticking. Drain noodles then rinse under cold running water until cool.
- Line cooled lasagna noodles in a single layer on prepared sheet pan with saran wrap then place another piece of saran wrap on top and line a second layer of noodles on the saran wrap to prevent sticking. Cover the top with more saran wrap then set noodles aside.
For the meat and sauce layer:
- Heat a large skillet over medium-high heat then add ground beef, onion or shallot, garlic, and salt and pepper to taste. Brown beef, breaking it up as it cooks then turn off the heat and drain. Return beef mixture to the skillet then add marinara sauce and stir to combine. Set aside to cool slightly.
For the ricotta cheese layer:
- To a medium-sized bowl, add ricotta cheese, parmesan cheese, parsley flakes, pepper, and salt then stir to combine. Scoop mixture into a gallon-size Ziplock bag then snip off one corner to make applying and spreading it onto the noodles easier.
Assembly:
- Scoop 3/4 cup of the meat/sauce mixture into the bottom of the prepared 9×13” baking dish then spread into a thin layer. Line lasagna noodles across the baking dish going the short way (see photos. I use 3 for the first layer, then 3-1/2 lasagna noodles for the 2nd and 3rd layers.) Next pipe 1/3 of the ricotta cheese mixture onto the noodles and spread into a thin layer using the back of a spoon or an offset spatula. Spoon on 1/3 of the remaining meat/sauce mixture then spread into an even layer. Sprinkle on 1/3 of the shredded mozzarella cheese. Repeat layers — noodles, ricotta mixture, meat mixture, shredded cheese — two more times for a total of 3 layers.
- Cover the lasagna with a piece of nonstick sprayed foil then bake for 20 minutes. Carefully uncover then continue to bake until the lasagna is deep golden brown on top and bubbly, 20-25 additional minutes. Let lasagna sit for 15-20 minutes then slice into squares and serve.
Notes
- I recommend using Jovial gluten free brown rice lasagna noodles in this recipe, versus a corn/rice noodle blend, or gluten free no-boil/oven-ready noodles. Brown rice noodles hold up better to parboiling/baking, and no-boil noodles can be inconsistent in texture in the final baked lasagna.
Nutrition
Nutritional values are estimates only. Please read our full nutrition information disclaimer.
Photos by Ashley McLaughlin


Have you ever frozen this? My gluten free mom is in the hospital and I would like to make it and freeze individual servings for her. Thanks!
Hi Cindy, I’m so sorry to hear about your Mom — I hope she makes a quick and full recovery. You can freeze individual portions of baked gluten free lasagna without affecting the texture too much. Let the lasagna cool completely then slice into individual-size portions and place in freezer-safe containers. Refrigerate until fully chilled then freeze. Thaw for 24 hours in the fridge then microwave to reheat.
I’m making this as a bereavement meal for a family friend. What’s the best way for them to heat it up after I bake it?
That is so kind of you — I’m so sorry to hear this. They can eat it hot/warm, or if it will be chilled after baking, they can warm up individual slices in the microwave.
I do not like ricotta cheese or anything similar… what would you recommend? More mozzarella? We’re going to try this using some ground deer.. I’m excited for it!
Hi Erica! Exactly — I’d just add more mozzarella. I hope you love it!
Hi! I am making this tonight and I can’t wait! It sounds sooo good. I learned from the TV show America’s Test Kitchen to soak your no boil noodles in warm water for 15 or more minutes. This always has worked for me and the noodles are perfect.
That sounds like a great tip! Let us know how it goes!
I made this today using Jovial no bake sheets and tried the tip of soaking them in hot water. The sheets fell apart and the water was super starchy. Is that normal? I assembled it and am baking it tomorrow but I’m worried it won’t come out as intended.
Hi Christine! This is why I included in the copy that I don’t recommend no bake noodles — they’re SO hard to get right! That said, I’m sure it will come out tasting delicious!
This looks amazing! I’m excited to make it for a group of friends I am hosting that are all GF!
Two quick questions though.
1. I am wanting to use the Cappellos lasagna noodles you mentioned because a few of my friends are also grain free and can’t have the brown rice noodles. Would you do anything different using those or follow the directions as usual just subbing out the noodles?
2. If I am adding in a veggie layer, where in the assembly should I put it?
Thank you soooo much!!
Hi Katie! For the Cappellos noodles, they only need to be thawed vs pre-cooked so you would just layer those in straight from being thawed. For the veggie layer, add between the meat sauce layer, and shredded cheese layers. I hope that helps!! :D
The only gluten-free noodles I’ve had success with are fresh fettuccine noodles from a local grocery store. Anytime I’ve made gluten-free pasta they fall apart and turn to mush. Maybe I’m over boiling? I’m not sure. So when you say parboil for four or five minutes you mean once the water comes to a boil and you put the noodles into the boiling water, you cook it for that long? Or after you put the noodles into the boiling water you wait for it to start boiling again (because when you put the noodles in there, it decreases the temperature of the water) and then cook 4-5 min?
Hi Gina! Once the water comes back to a boil (after just a minute or so — place a lid on top to help bring it back to a boil if needed), then start your timer.
This is a super yummy recipe! Have made it a few times! simply delicious! I used Palmini Hearts of palm lasagna sheets! My fiancé keeps asking for more!
Thrilled it was a hit, Alexis, and that you found a way to make it work for you! Thank you so much for your feedback!
Can you clarify? Your notes say, “As far as individual components, you can make the meat sauce and ricotta cheese mixture up to several days in advance. Save parboiling the noodles for the day you bake it. Alternatively, you can completely assemble the gluten free lasagne up to 24 hours ahead of baking.”. Does that mean you can assemble it the day before but it won’t be as good? And if you do that, do you parboil or skip that step? I host and make lasagna for Easter and Easter morning I’m limited on time, but I’m new to GF cooking and want to get it right. Thank you!
Hi Christine! I mean if you’re not fully assembling the lasagna ahead of time, only pre-make the meat and cheese mixtures and par boil the noodles fresh the day of. Versus parboiling the noodles then refrigerating them overnight. Either way — fully assembling a day ahead of time, OR making just the meat and cheese layers a day of ahead of time — will create a delicious lasagna. If you’re limited on time, I’d fully assemble the day prior. Lmk if any other questions – happy to help!
Thank you! My Italian grandmother would indeed be appalled at how much research I’m doing on this lasagna. (Should I add extra sauce if I assemble the night before?!)
No you’re fine — I totally get it!! It does take some time and money and so you want to get it right! If all the ingredients are cool / chilled, you won’t need to add extra sauce. If they’re warm, I’d maybe add a bit more sauce. :)