Mini Vegetable Enchilada Stacks are perfectly proportioned and full of fresh veggies. These meatless enchiladas are no rolling-required!
“The enchilada mini stacks are DELICIOUS. Thank you for posting. I’ve recently become vegetarian again, and also GF … I didn’t even miss the meat.”
If you’re seeking a meatless meal that’s not only unbelievably delicious, but super satisfying too, look no further than my Mini Vegetable Enchilada Stacks. You’ll never miss the meat!
Enchiladas: No Rolling Required
If you’re anything like me, you love enchiladas but don’t always feel like filling and rolling them up.
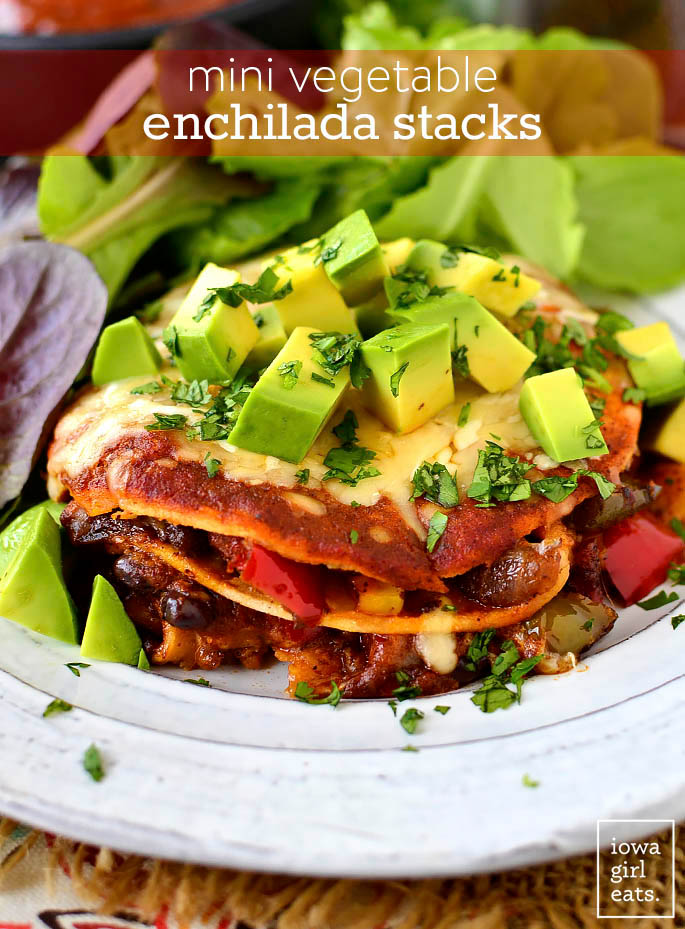
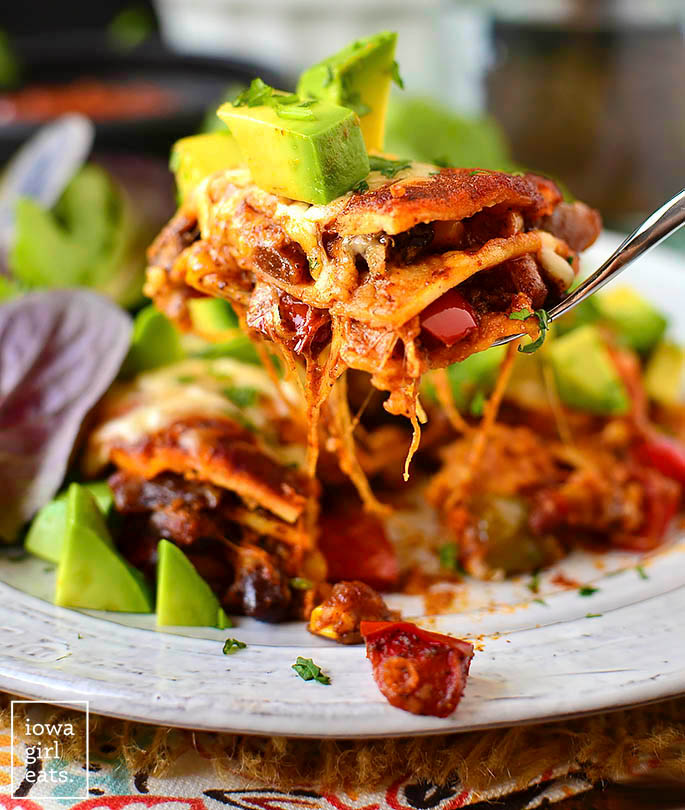
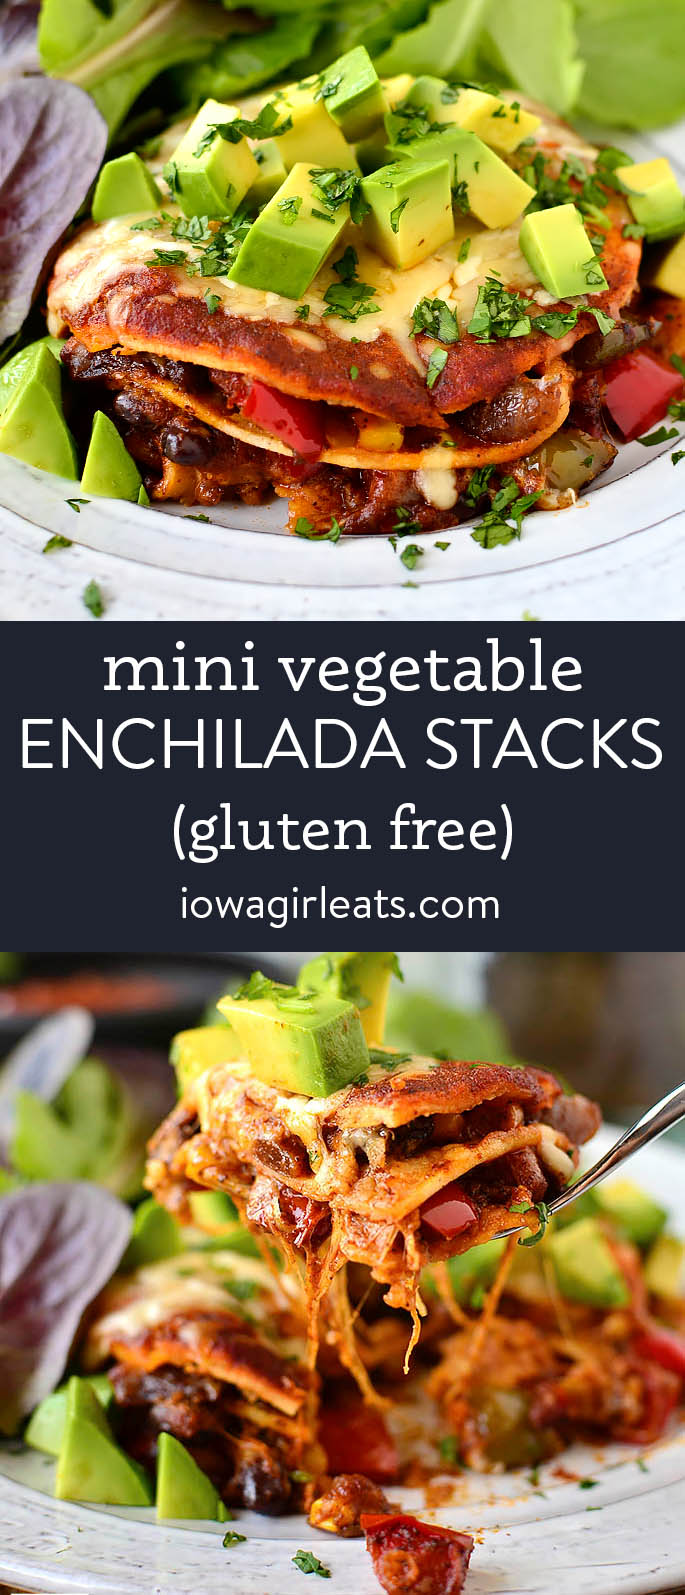
Problem solved with these simple enchilada stacks that are stuffed with healthy veggies and bold Tex-Mex flavor. Mini corn tortillas are layered with sauteed peppers, onions, sweet corn, and black beans, plus plenty of shredded Mexican cheese and savory homemade enchilada sauce, then baked until hot and bubbly.
They make the most adorable, individual-sized enchilada stacks that are not only simple to make, but fun to eat.
Try Vegetarian Cheese Enchiladas
How to Make this Recipe
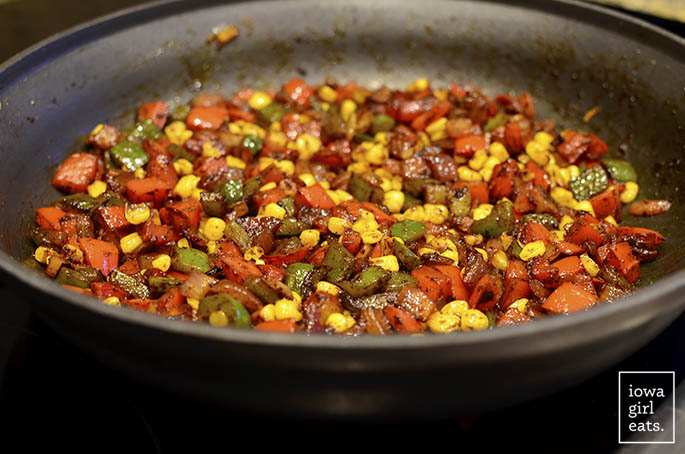
Start by heating extra virgin olive oil in a large skillet. Add chopped red bell pepper, green bell pepper, and red onion then season with a chili powder blend and salt.
Saute until the peppers are crisp-tender then add frozen sweet corn and saute for another minute or two. Finally, stir in canned black beans that have been drained and rinsed. Add more chili pepper blend and/or salt to taste then stir to combine.
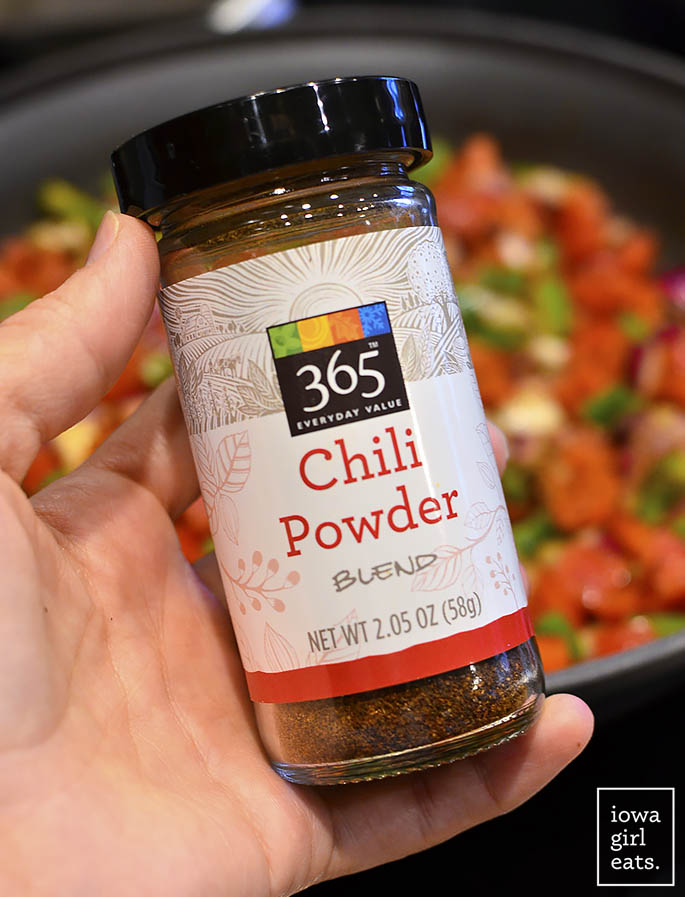
This is the chili pepper blend I used. It’s a mixture of chili peppers, garlic powder, cumin, oregano, coriander, cloves, and allspice. If you don’t have a blend like this on hand, I recommend seasoning to taste with chili powder, garlic powder, cumin, and just a little bit of dried oregano.
Set the vegetable mixture aside to cool for a bit (it can be made a day ahead of time) then preheat the oven to 400 degrees and spray a 9×13″ baking pan with nonstick spray.
Place 4″ corn tortillas in the bottom of the pan then top with a scoop of the vegetables. Next add red enchilada sauce and a sprinkling of a Mexican cheese blend.
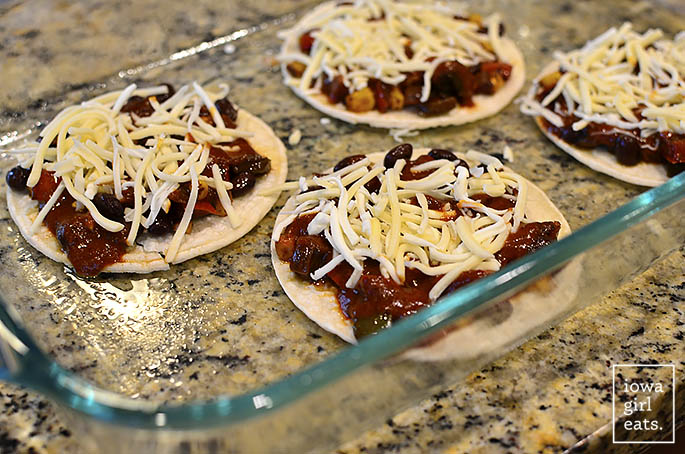
Repeat the tortilla/vegetable/sauce/cheese layers one more time then top each stack with a tortilla, sauce, and more cheese.
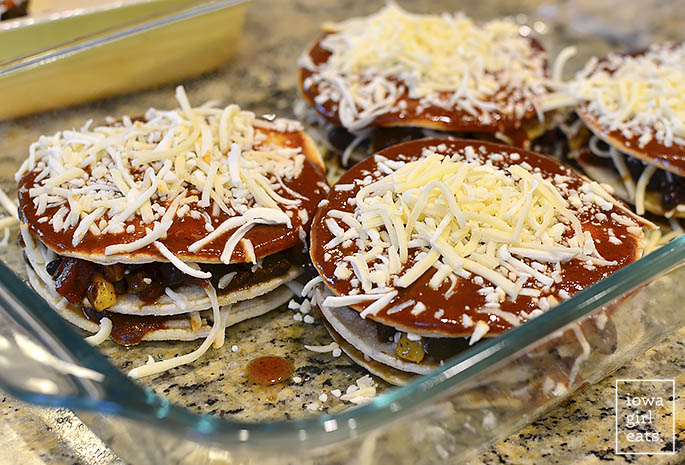
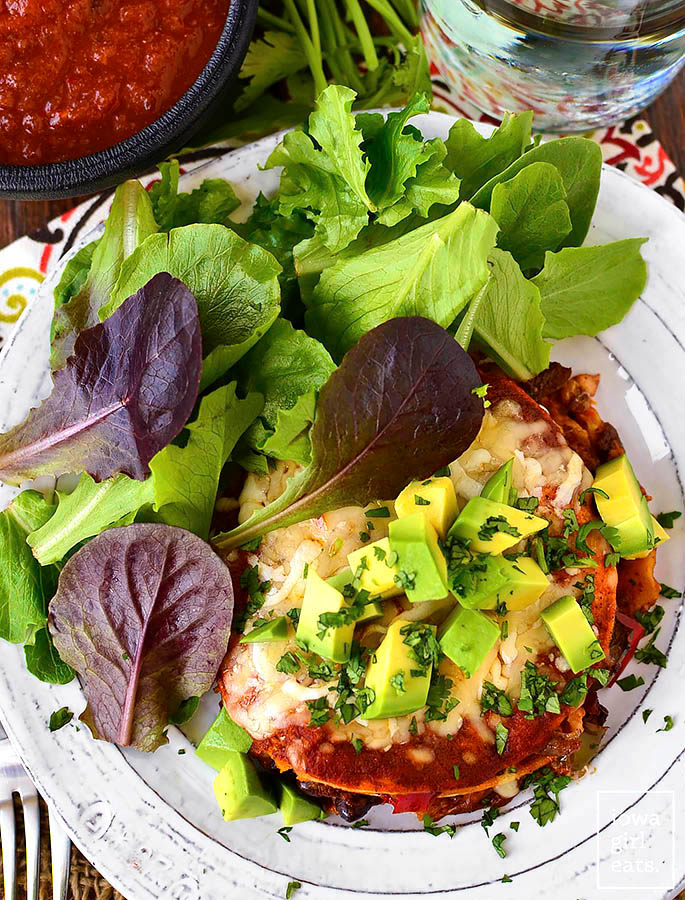
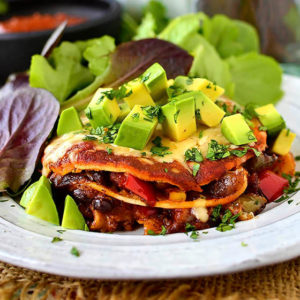
Cover the baking pan with foil then bake for 25-30 minutes, or until the cheese has melted. Use a spatula to transfer each enchilada stack to a plate then top with fresh avocado, cilantro, salsa, etc and dig in.
I hope you love each bite of these easy, cheesy, and healthy enchiladas – enjoy!

More Tex-Mex Favorites
- Beef Enchiladas
- Restaurant-Style Ground Beef
- Beef and Veggie Enchilada Skillet
- Cheese Enchiladas with Red Sauce
- Chicken Fajitas
- Cheesy Chicken Burrito Skillet
- Black Bean and Sweet Potato Enchilada Skillet
Equipment
Ingredients
- 2 Tablespoons extra virgin olive oil
- 1 green bell pepper, seeded and chopped
- 1 red bell pepper, seeded and chopped
- 1 small red onion, chopped
- 3-4 teaspoons chili powder blend
- salt
- 1 cup frozen sweet corn kernels
- 1 cup canned black beans, drained and rinsed
- 15 street taco-sized corn tortillas, I used Mission brand
- 1-1/2 cups gluten free red enchilada sauce
- 8 oz shredded Mexican cheese blend
- Optional toppings: cilantro, avocado or guacamole, salsa
Directions
- Preheat oven to 400 degrees then spray a 9×13″ casserole dish with nonstick spray and set aside.
- Heat extra virgin olive oil in a large, 12″ skillet over medium-high heat. Add bell peppers and onions, season with chili powder blend and salt, then saute until peppers are crisp tender, 8-10 minutes. Add corn then saute until tender, 1-2 minutes. Taste vegetables then add more chili powder blend and/or salt if needed. Stir in black beans then set mixture aside to cool slightly.
- Place 5 tortillas in the bottom of the prepared baking dish then top each with a big spoonful of the vegetable mixture. Add 2-3 spoonfuls of sauce then a sprinkling of cheese, and then top with another tortilla. Repeat vegetable, sauce, and cheese layers then top stacks with 1 more tortilla and cover with sauce and cheese.
- Cover baking dish with nonstick sprayed foil then bake for 25-30 minutes or until cheese has melted. Serve with toppings and warmed enchilada sauce if desired.
Notes
- I used Mission brand gluten-free “Street Tacos” sized corn tortillas.
- Adapted from Pinch of Yum
Nutrition
Nutritional values are estimates only. Please read our full nutrition information disclaimer.


First time to make these, and they were so delicious! Everything melted together perfectly!
Making this for a new mom- would you bake it at home and then just have them heat it up themselves? Concerned the sauce would make things too soggy if they bake it totally there.
I would assemble then have them bake. One way to help prevent the tortillas from soaking up a ton of sauce is to make sure the sauce is totally chilled before assembling. If they’re going to eat it that night, you could bake at home then take it right over.
I had to report back! We made these last night and they were sooooo yummy! Thank you for a delicious vegetarian recipe!
Awesome!! So glad you loved them too! :)
OMG Kristin, these were amazing! I made them for dinner last night and they were so good. I think it’s my new favorite way to make enchiladas! No rolling, no mess when trying to cut into a casserole-style enchilada. Thanks for another great recipe!
Yes exactly!! So glad you loved them! :)
I can’t find the Chili Powder Blend – I know you said to mix chili powder, garlic powder, cumin, and just a little bit of dried oregano – but do you know about portions? Even parts of the first three or more chili powder, less of the rest? Thanks! I can’t wait to make this for my sister this weekend (she just had a new baby!).
I would start with 2 teaspoons chili powder, 1/2 teaspoon garlic powder, 1/4 teaspoon cumin, and a pinch of oregano, then add more chili powder as necessary to get a good flavor going. I hope she loves the dish!! :)
I really wanted to make these tonight, but could not find the street taco size. Not a thing yet here in Michigan, I guess!
Do you think these could be frozen successfully?
I bet they could! I might undercook the peppers just a bit to make sure they don’t get soggy after the thaw >> baking process.
YUM! I Love this idea! so sweet of you to think of you to think of friends in their time of need. Food is a powerful healing source.
Yum! These look adorably delish
I hope you love them, Sara!
These look amazing!! What a wonderful gesture for your friend, it is always so comforting to have a delicious meal when we’re going through difficult times. I can’t wait to put these on my meal plan for the week, they look so delicious!
I hope you enjoy, Krista, you’ll have to come back and let us know what you think!
Holy moly these look scrumptious! Must add these to our rotation for next week!
They are seriously so so good – enjoy! :)
Sounds delish! I’ll have to add it to my menu next week. I gotta ask where are your sunnies from? Looking for a new pair…cute!
Thanks! They’re a few years old from Banana Republic but they always seem to have similar looking pairs every season.
Do you happen to have the nutritional break down for this recipe so that we can figure out the Smart Points value? Thank you for your time :)
Hi Krista! I don’t but, recommend Livestrong’s recipe calculator tool if you need that info! https://www.livestrong.com/login/