A few weeks ago at ChoppedCon there was a table of temporary tattoos that said fun things like, love always, or be happy, and live today. We were encouraged to slap on the saying that best fit our personality then ask each other about them as a conversation starter. Want to know what my temporary tattoo said?
YAY!
Yay.
No seriously, yay! Of all the words in my vocabulary, I’m probably saying “yay” the most on any given day. What can I say, I’m easily excitable.
Chicken broth is on sale at the store today. YAY!
The Mindy Project is on tonight. YAY!
I made it out of Target without spending $100. YAY!
I’m sharing a fun and easy DIY project with you today. YAAAAY!
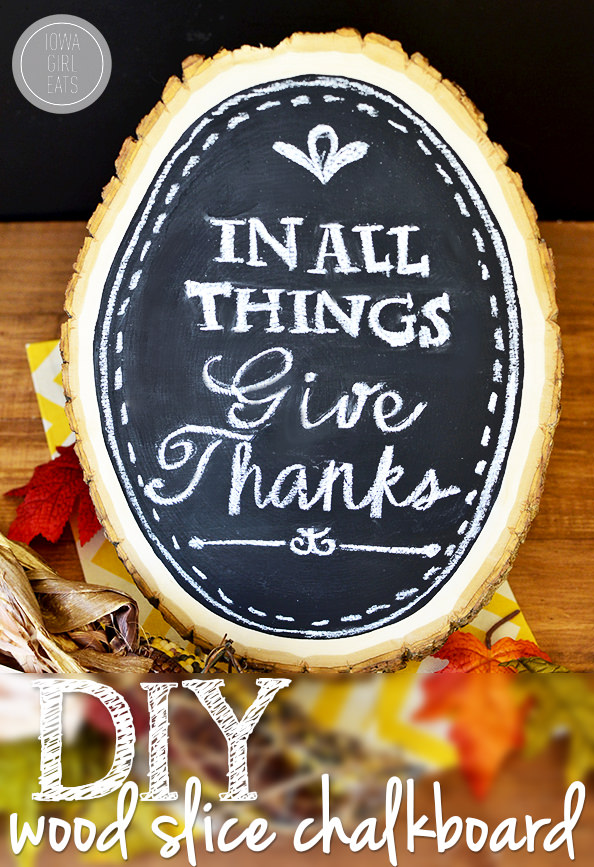
If you read my bi-monthly Friday Favorites than you know I am capital O-besessed with chalkboard, well, anything. I have…hold on I’m counting…four in the house at the moment. Though I guess this DIY Wood Slice Chalkboard, my first homemade chalkboard, makes five!
A few weeks ago Lincoln and I were perusing Michael’s (the craft store y’all) looking for any and all cheap black frames to recreate this masterpiece on our entryway wall, when I stumbled upon a random collection of wood slices. I was immediately inspired to slather it with chalkboard paint then create a weekly menu chalkboard to share with you, but it turned out so well that I figured I’d show a few different ways and techniques to create and customize your own DIY Wood Slice Chalkboard. This is SUCH a fun project that you will have a blast creating and customizing for your home.
Say it with me now – YAY!
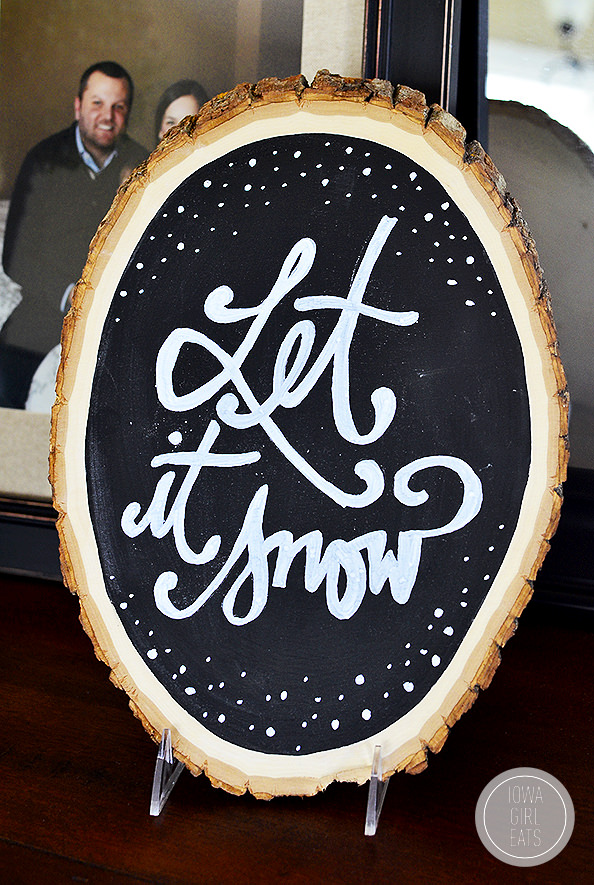
(And let the record show that it should only snow on Christmas Day. Amen.)
Start with that aforementioned wood slice. Michael’s had a ton of these wood slices but if you can’t find one at your local craft store you can buy one here. These slices are great because they’re pre-sanded and have an awesome rustic look from the bark around the outside edges. You’ll also need a tube of chalkboard paint. This one was less than $5.
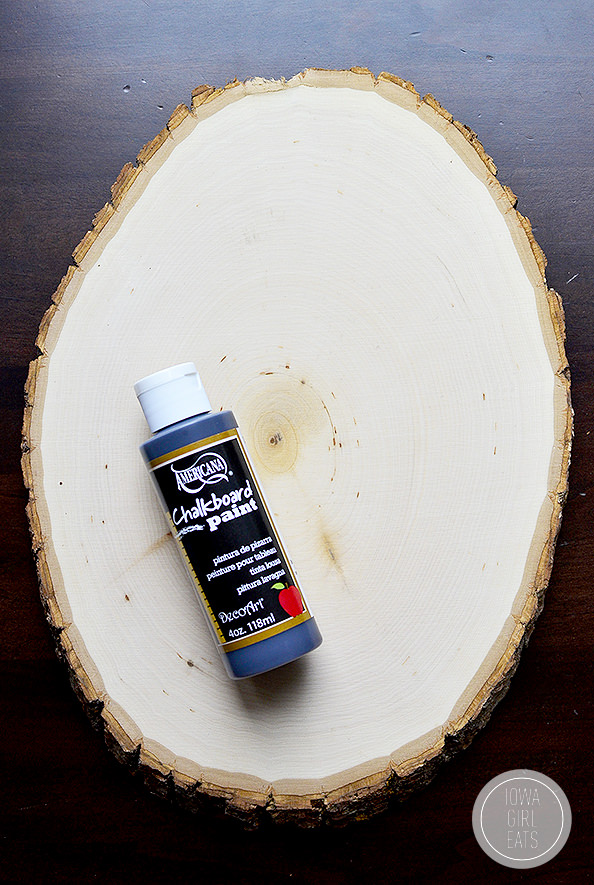
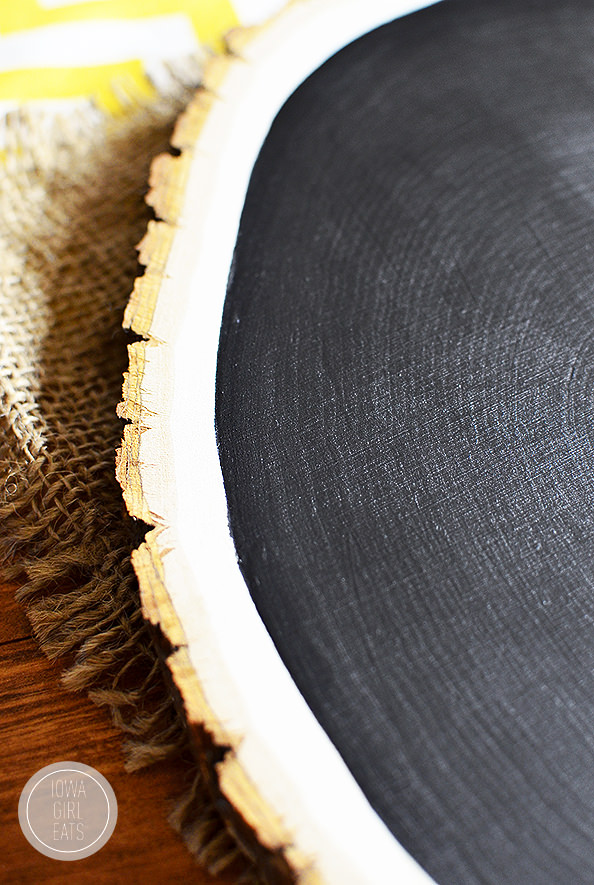
Paint the wood slice according to the chalkboard paint directions. Mine had me paint on one coat horizontally then one vertically, waiting an hour between coats, then let it sit and season for 24 hours before decorating. You could draw an outline with a pencil first, or freehand it like I did.
Next find the design you want to decorate your wood slice with. I simply Google image searched “free Thanksgiving print out” or “free holiday print out” (you get the idea) to find the design I wanted, then resized it to match the size of my wood slice. You can use Microsoft Word or Photoshop to resize the image – it doesn’t matter if it gets fuzzy when stretched!
Of course you could always free-design but I don’t have a creative design bone in my body!
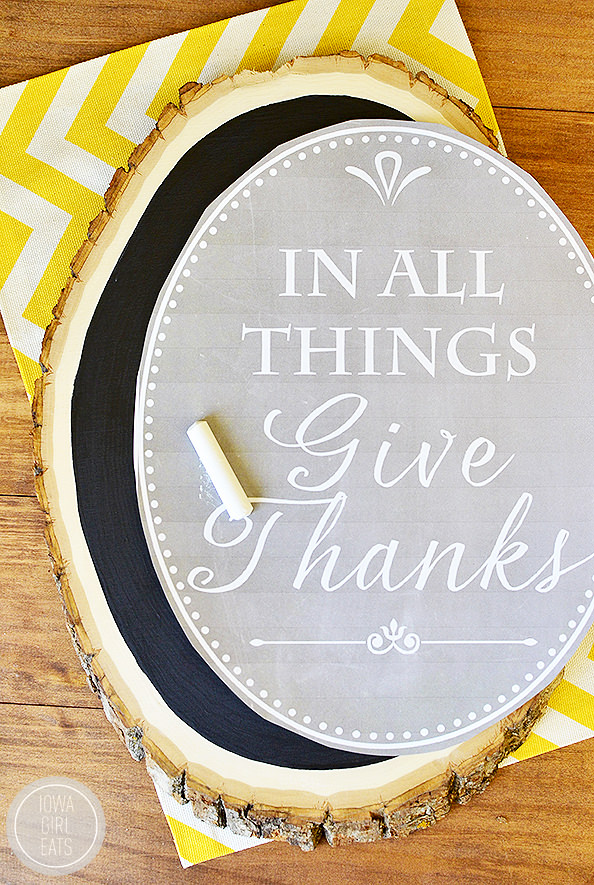
If you’re going the print out route, flip the design over then rub a piece of chalk all over the backside. Flip then very gently tap to remove any excess chalk (don’t tap too hard or it will all fall off) then center on the wood slice and set it down. Next, use a pencil with no lead or a stylus to gently trace the design. Don’t press too hard or you could carve the design into the wood itself.
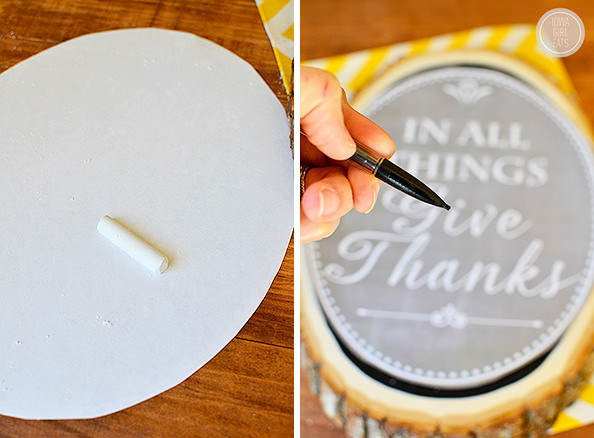
Ta da – no creative design bones necessary! As you can see, the design is now on the chalkboard to trace but there’s also a lot of excess chalk dust. Blow the chalk dust off (I took this photo pre-blow) then use a wet Q-tip to clean things up before you start tracing.
There’s 2 routes you can go next.
1. Trace the design with a stick of chalk.
PROS: A non-perfect chalkboard is pretty cute and homey-feeling. Regular chalk is also easy to remove with a damp cloth so you can change the design/lettering as often as you want.
CONS: a piece of chalk isn’t extremely precise and can be a bit dusty.
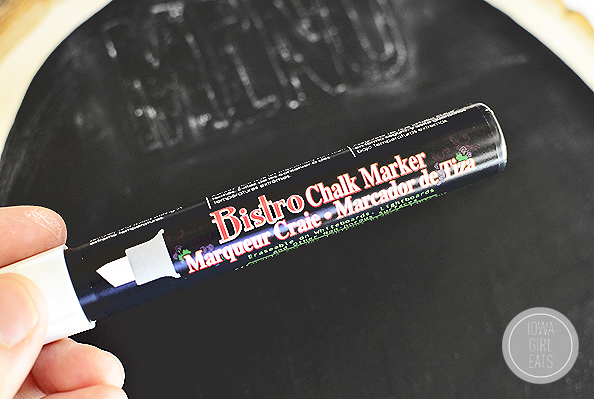
2. Trace the design with a chalk marker.
PROS: Design/lettering is very precise and looks well, COOL!
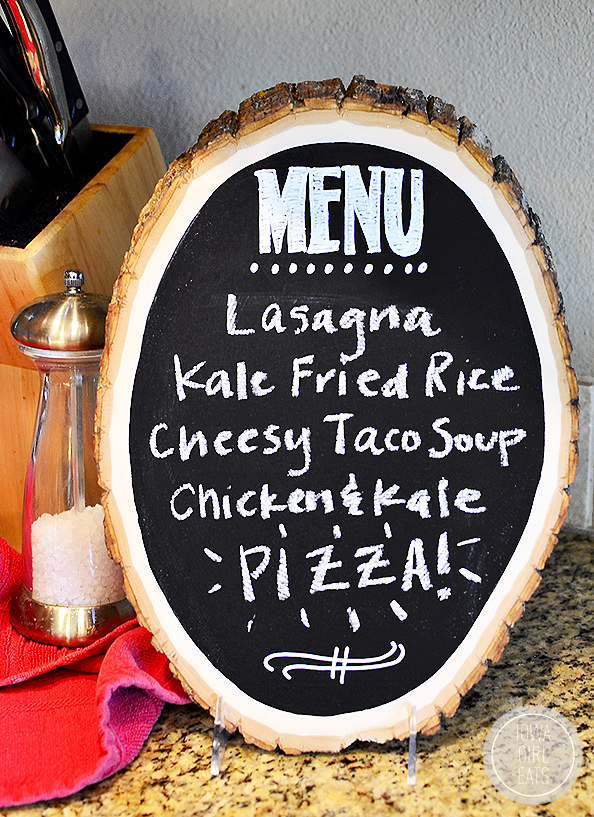
CONS: Chalk marker doesn’t come out of painted chalkboard surfaces (unless you’re using an ammonia-based cleaner and I’m just like, eh.) While chalk marker wipes off of a finished chalkboard surface (like this board I got from the Target $1 bin which easily wipes clean with a damp paper towel,) it doesn’t come completely off a painted chalkboard surface which means you’ll have to paint another coat of chalkboard paint on top if you want to change the design. This isn’t a huge deal if you want to leave a certain design up for awhile, as it takes 3 minutes to repaint, but probably isn’t practical if you want to change it for a weekly menu, for instance.
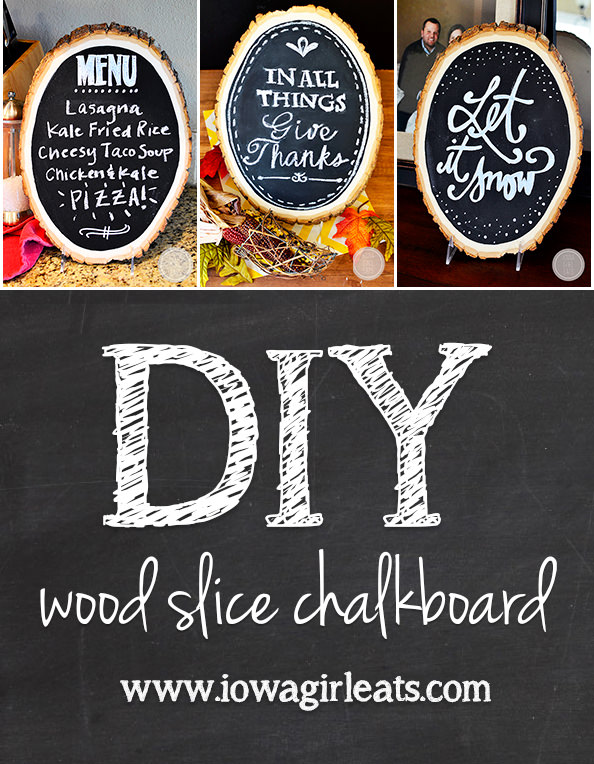
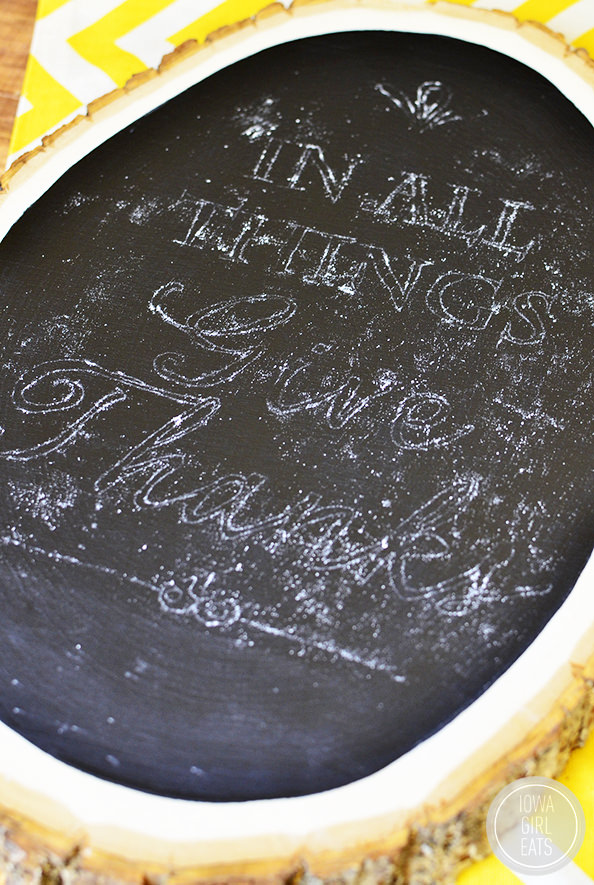
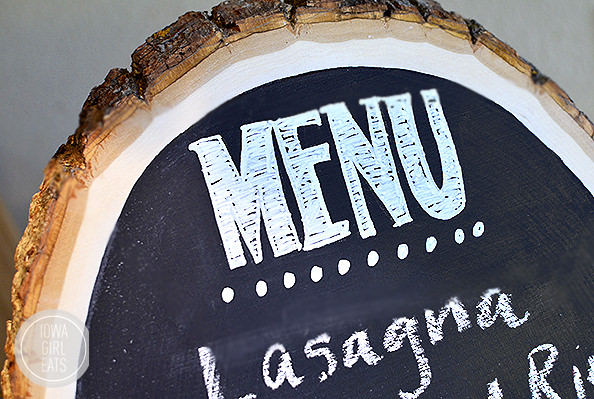
I went a couple different routes. The “Give Thanks” chalkboard at the very top is all chalk, the “Let it Snow” design is all chalk marker, and the “Menu” below is a mix of both. I colored the “menu” in with chalk marker then used regular chalk to write the recipes which change weekly.
Like I said – pros and cons to both – but whichever way you go this will just be the cutest. You can also either prop your chalkboard up on a plate displayer (can’t think of what that’s called!) or attach a bracket to the back and hang it up. I can see this being a fun girl’s night craft project (perhaps trace the design before serving the wine?) or even a fun project for kids. Whichever way you go – have fun with it!


The chalkboard marker will wipe off easily with a slightly damp Mr Clean Magic Eraser
[…] DIY Wood Slice Chalkboard […]
[…] an ecofriendly site promoting repurposing through reinvention. She has a master of arts degree. Diy wood slice chalkboard iowa girl eats. This fun and easy diy wood slice chalkboard can be customized for any event, occasion, or holiday […]
[…] DIY Wood Slice Chalkboard […]
[…] image via iowa girl eats […]
[…] DIY menu is made from a simple wood cross section and a generous slathering of chalkboard paint. Bon […]
[…] DIY menu is made from a simple wood cross section and a generous slathering of chalkboard paint. Bon […]
[…] DIY Wood Slice Chalkboard from Iowa Girl Eats […]
[…] paint? It is easy-peasy and turns ordinary objects into functional art. I especially like this DIY Wood Slice Chalkboard from Iowa Girl […]
[…] sister gave me the heads-up about a terrific wood slice chalkboard DIY. Perfect for so many different […]
[…] What a cute idea to turn a wood slice into a chalkboard menu/sign! […]
I had initially SKIPPED over this post becuz I thought “where will I get a piece of tree wood that looks like that”??? Now I read– MICHAELS??!! EASY peasy!!! I am ALL IN!! Can’t wait to make this. THANK YOU!!!! :)
My daughter also informed me that the chalk pencils that seamstresses use work well for writing on chalkboard. You get them at the fabric stores. I have a terrible time when trying to write with a thick piece of chalk that isn’t pointed and had heard the chalk markers are hard to get off sometimes. I love the chalk pencil idea and no wonder Hannah’s writing always looks so good on her chalkboard items! :) Just thought I would share.
Very cool – I will definitely check that out. If it’s Heidi-approved, it will most likely be Kristin-approved, too!
[…] LOVE this! Might have to recreate. From Iowa Girl Eats […]
This is so cute! My husband just cut down a dead tree in our woods and I asked him to slice 1/4 inch pieces of wood for coasters and chargers. I’m going to seal them soon. Now I’m going to ask him to cut a few more so I can paint them! Thank you!
I say I am going to do a lot of DIY projects…but it usually doesn’t happen. This is one I am DEFINITELY doing! Next time I am in Michael’s this is happening! I will tag you in the photo when I am done with it! :) YAY!
This is SO cute! I had no idea you could buy a wood piece like this. Guess I should visit the craft store more often :)
I just might have to try this! I have another DIY project that I need to go to the craft store for so I will have to pick up this stuff too. Thanks!
So cute! I became obsessed with chalkboards when I was looking for ideas for my son’s 1st birthday party. I loved the boards with all the one year stats. We now have a few to use with photos but I especially love the tree ring around these.
That is so clever!!!!!!