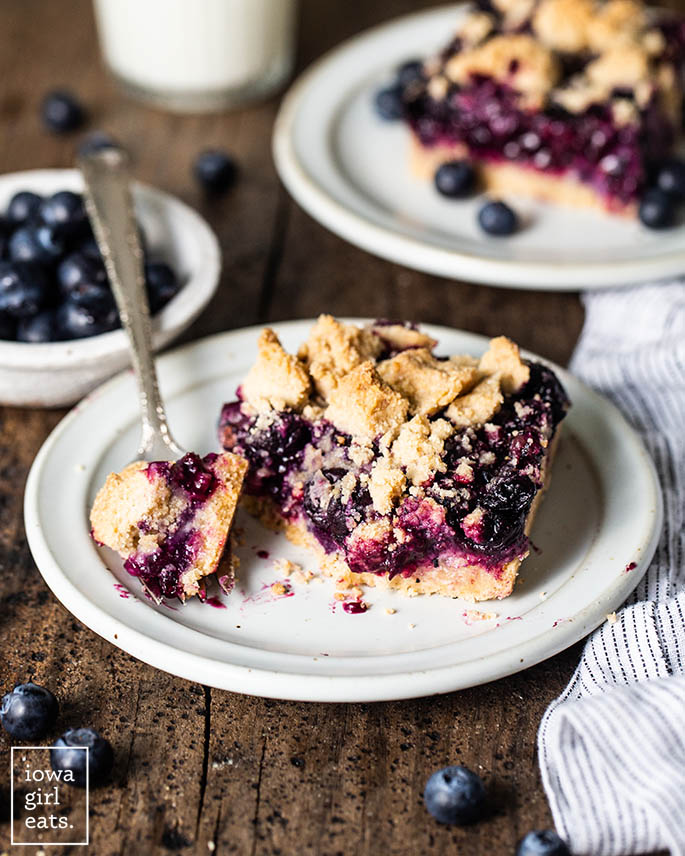
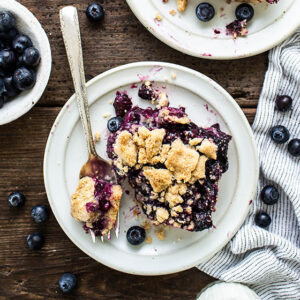
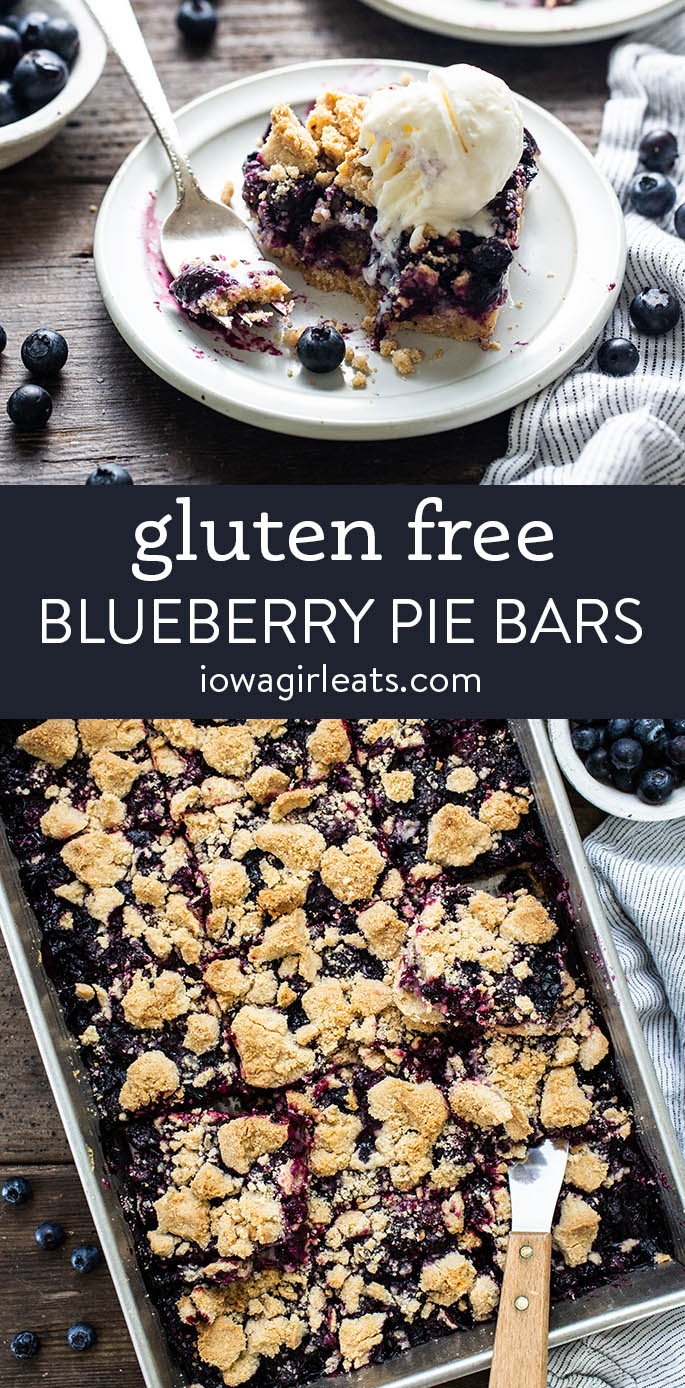
Gluten Free Blueberry Pie Bars taste like old fashioned pie — without all the work! A juicy blueberry filling is sandwiched between buttery crumb layers.
I made you Gluten Free Blueberry Pie Bars to celebrate the arrival of fresh fruit and berry season, though as I sat down to write this post it began to snow.
Iowa keeping us HUMBLE!
At any rate, at some point, this wretched snow will melt and then we can confidently dig into these gorgeous, juicy dessert bars that taste like blueberry pie made gluten free — and EASY!
Easy Gluten Free Blueberry Pie Bars
Whoever has compared something simple or pleasurable to making pie has never made gluten free pie crust. Honestly, I found making pie crust PCD (pre Celiac Disease) stressful, and having to use gluten free flour adds another layer of unpredictability.
Problem solved with this easy bar version of blueberry pie which comes out perfect every single time.
A buttery, shortbread-esque mixture forms both the crust and crumbly topping, sandwiching sweet and juicy blueberry pie filling with hints of lemon and vanilla. Oh my goodness, they are truly so delicious and tastes like summer! Best of all, nobody would ever guess they’re gluten free.
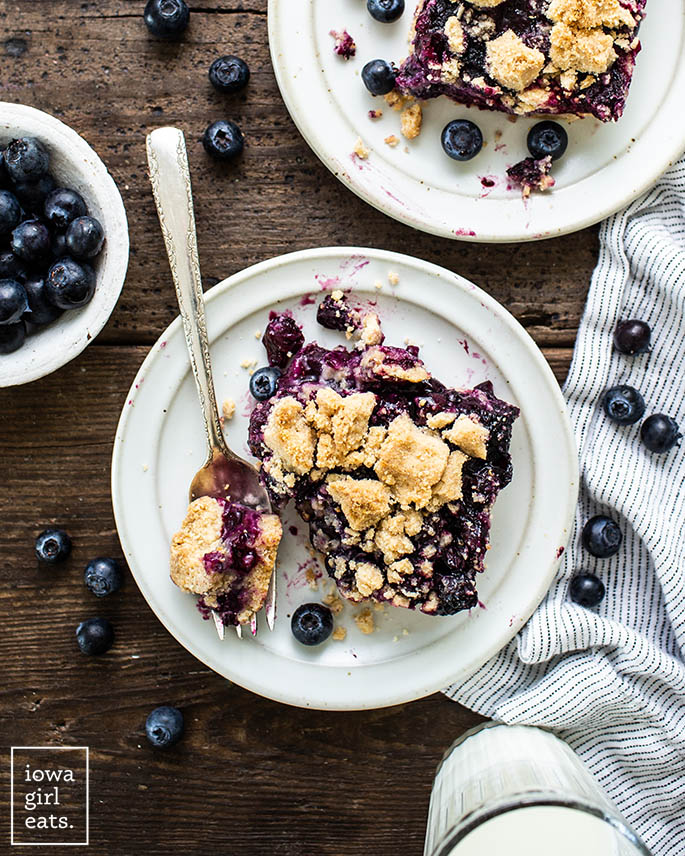
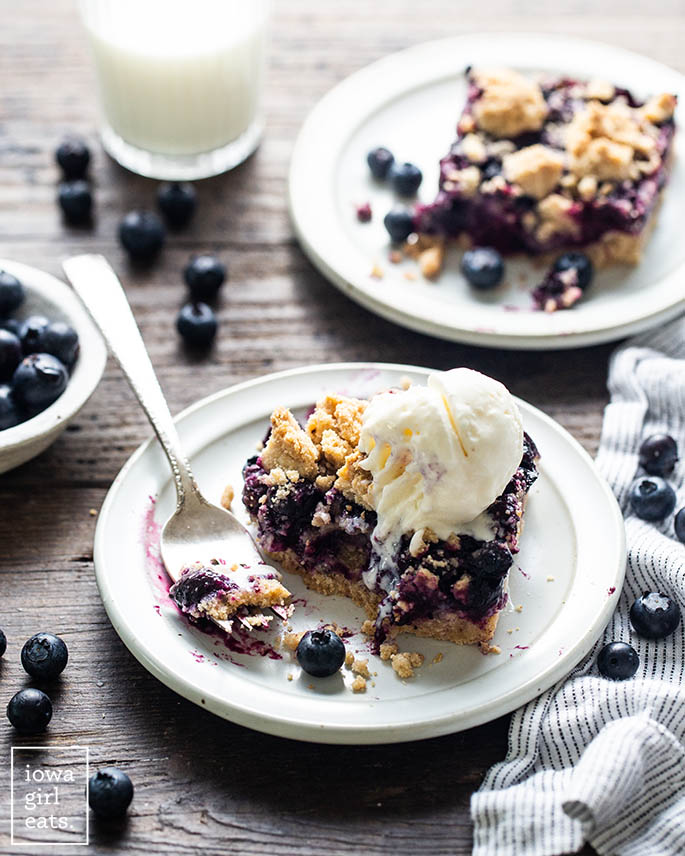
Bake then slice into bars for your next potluck or gathering — scoop of vanilla ice cream optional, but recommended!
Ingredients Needed
Usually the only items I need to pick up from the store to make these bars are fresh blueberries plus a lemon. The rest are pantry staples. Here’s what you’ll need:
- Fresh blueberries: nearly 2lbs of fresh blueberries create a sweet and juicy pie filling.
- Granulated sugar and brown sugar: granulated sugar sweetens both the blueberry pie filling and crust, while brown sugar sweetens and adds moisture to the crust.
- Gluten free flour blend: I tested this recipe using Bob’s Red Mill Gluten Free 1-to-1 Flour Blend, which is used in both the crust and blueberry filling. If you don’t use this particular gluten free flour blend, be sure the one you use contains a binder such as xanthan gum.
- Lemon: the zest and fresh juice from a lemon really brighten the blueberry filling. Definitely do not skip!
- Egg: gives the crust structure.
- Vanilla: a splash of vanilla extract added to both the blueberries and crust adds cozy, yummy flavor.
- Cinnamon: a dash in the crust will make your kitchen smell heavenly while these bars bake!
- Baking powder: provides a lift to the pie crust.
- Salt: to balance out the sweetness of the blueberry pie bars.
- Butter: cold, cubed butter creates a flaky, golden brown crust and topping.
Pin this now to find it later
Pin ItTop Recipe Tips
These gluten free pie bars are inherently easy (ok, as pie, lol) but there are two crucial tips to keep in mind before devouring.
- Scoop and level. The way you measure flour for gluten free baking recipes matters. Instead of dunking the measuring cup directly into the bag or container of flour, which compacts the flour in the cup, use the “scoop and level” method of measuring flour.
- Add a spoonful of flour one at a time into your measuring cup until it heaps over the top then use the back of a butter knife to level it off. When testing this recipe, I compared the amount of flour using the scoop and level method, vs dipping the cup directly into the bag of gluten free flour, and the latter resulted in nearly 1/2 cup extra flour which would have made these bars dry and crumbly.
- Wait a day. Just like I advise in my recipe for Gluten Free Chocolate Cupcakes, do not even *think* about slicing into these bars the day they’re baked. My experience with gluten free baking over the past 10+ years has shown over and over again that most gluten free baked goods — especially bars — benefit from at least a 12 hour rest, becoming simultaneously softer yet sturdier. I don’t make the rules! Bottom line, wait a day after baking to slice this dessert into bars, otherwise they can crumble.
How to Store
As I mentioned, keep the bars on the counter for at least 12 hours prior to slicing, then serve ’em on up. Do you have leftovers?
- Store in the refrigerator: snap a lid on top of the baking dish if it comes with one, or transfer leftovers to an airtight container in the fridge and store for up to 3 more days.
- To freeze: freeze individual-sized portions of the baked Blueberry Pie Bars for up to 6 months. Thaw in the refrigerator.
Ready to bake?!
Try Gluten Free Lemon Bars
How to Make Gluten Free Blueberry Pie Bars
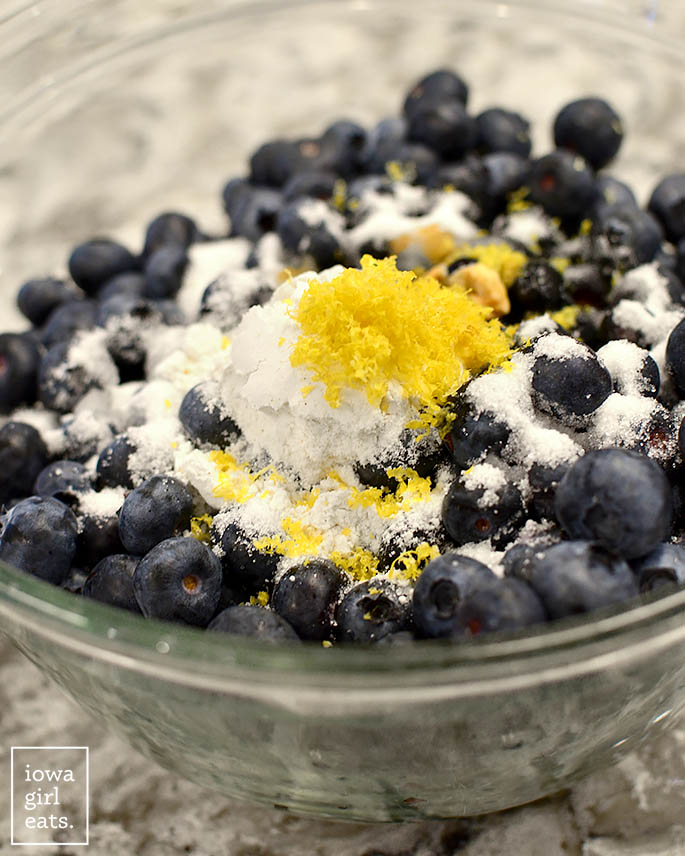
Step 1: Make the blueberry pie filling.
Start by adding fresh blueberries that have been washed and dried to a mixing bowl with granulated sugar, gluten free flour blend, lemon zest, and lemon juice. Use a large spoon or spatula to fold the mixture to combine then set aside.
Recipe Tip
This is the microplane I’ve been using to zest lemons for nearly 10 years — its a workhorse!
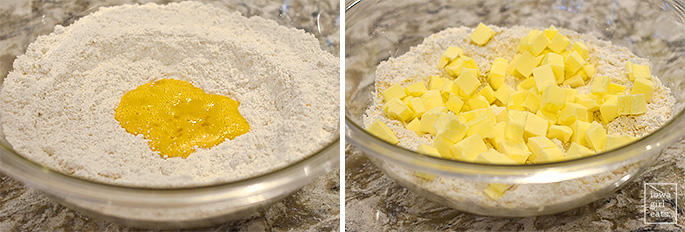
Step 2: Make the crust / crumble topping.
To a large mixing bowl add the gluten free flour blend, both brown sugar and granulated sugar, cinnamon, baking powder, and a pinch of salt then whisk to combine.
Add an egg whisked with a splash of vanilla extract then stir with a fork to incorporate it into the flour mixture.
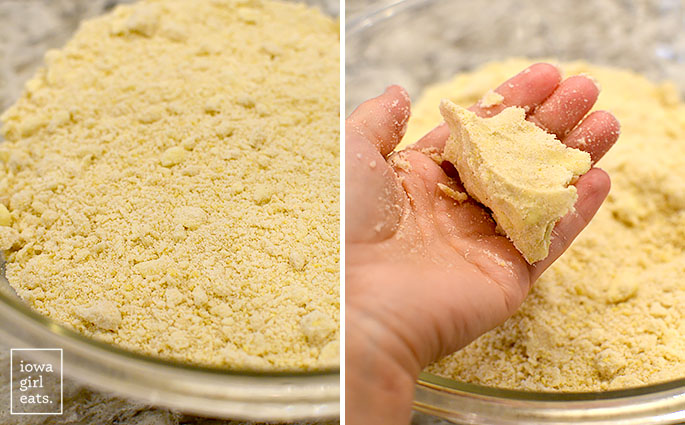
Next add cold, cubed butter to the bowl then use a pastry cutter or your fingers to mix and mash the butter into the flour and egg mixture until it’s the texture of sand.
This will take around 5 minutes or so — just keep squishing and mashing with your fingertips. At the end, the mixture should hold together in a clump when you squeeze it in your fist.
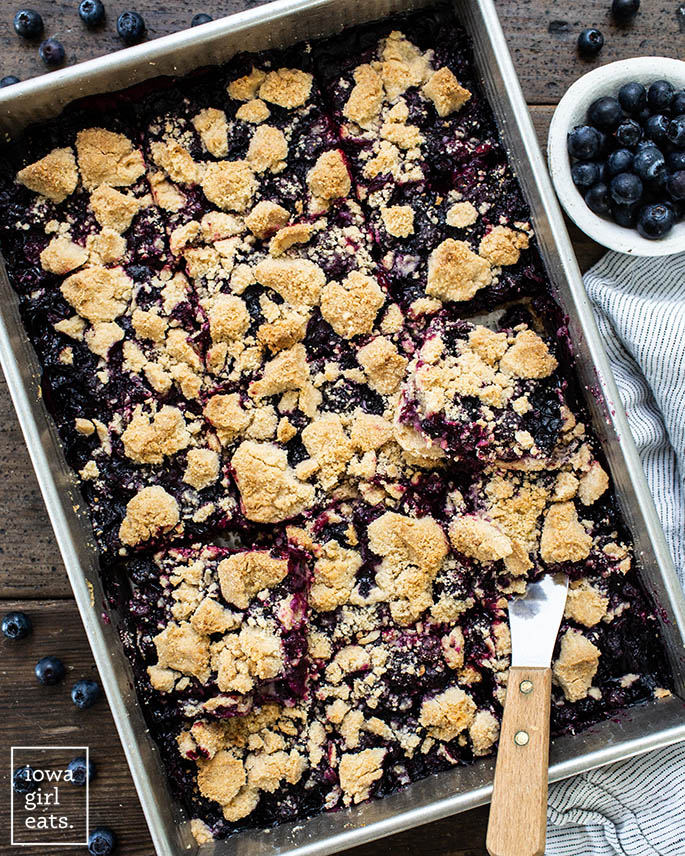
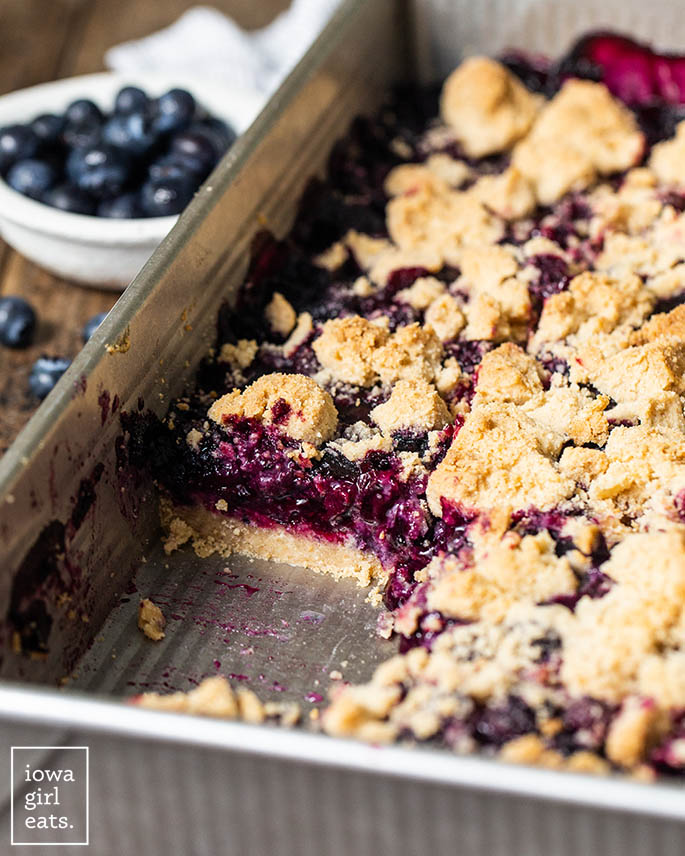
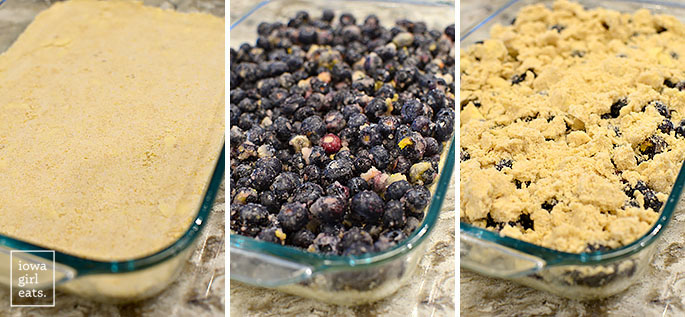
Step 3: Layer the crust, filling, and topping.
Scoop a little more than half the crust mixture into the bottom of a 9×13″ baking pan that’s been sprayed with nonstick spray then use a measuring cup or glass to press it into an even layer.
Scoop the blueberry pie filling on top then spread it into an even layer. Lastly, squeeze handfuls of the remaining crust mixture into clumps with your hands then crumble evenly over the blueberry filling.
Step 4: Bake.
Bake the bars for 38-40 minutes at 375 degrees or until the top is golden brown and the blueberries are bubbly, rotating the pan halfway through.
Recipe Tip
Check on the bars at the halfway mark — if the crumble topping is already browned, place a piece of foil on top of the pan (no need to crimp it) then continue to bake. Remove the foil when the bars have 10 minutes left to bake.

That’s all she wrote! Isn’t this the most beautiful and easy version of blueberry pie you’ve ever seen — made gluten free?!
Let the Blueberry Pie Bars rest in the baking dish for at least 12 hours before slicing and serving. You can slice big bars or cut them into squares if you’re serving a crowd.
No matter how you dish it, I hope you love every single bite of this happy little gluten free treat. Enjoy!
More Easy Summery Desserts
- Gluten Free Strawberry Shortcake
- Dirt Cake
- Gluten Free Blueberry Crisp
- Gluten Free S’Mores Bars
- Gluten Free Lemon Bars
- Gluten Free Peach Crisp
- Strawberry Rhubarb Crisp
Equipment
Ingredients
For the blueberry filling:
- 1-3/4 lbs fresh blueberries, 3 pints, washed and dried
- 1/2 cup granulated sugar
- 1 slightly heaping Tablespoon gluten free flour baking blend WITH binder, see notes
- 1 small lemon, zested then sliced in half
- 1 teaspoon vanilla extract
For the crust mixture:
- 3 cups gluten free baking flour blend WITH binder, see notes
- 1/2 cup granulated sugar
- 1/2 cup brown sugar
- 1 teaspoon baking powder
- 1/2 teaspoon cinnamon
- 1/4 teaspoon salt
- 1 large egg
- 1 teaspoon vanilla extract
- 1 cup cold butter, 2 sticks, cubed
Directions
- Preheat the oven to 375 degrees then spray a 9×13” baking pan with nonstick spray and set aside.
For the blueberry filling:
- To a medium-sized mixing bowl add the blueberries, sugar, gluten free flour blend, lemon zest, the juice of 1/2 lemon, and vanilla then fold with a spatula to combine. Set aside.
For the crust:
- To a large mixing bowl add the gluten free flour blend, granulated sugar, brown sugar, baking powder, cinnamon, and salt then whisk to combine.
- To a small bowl add the egg and vanilla then whisk with a fork to combine. Drizzle over the flour mixture then stir with the fork until incorporated. Add the cold, cubed butter then use a pastry cutter or your fingertips to blend the cold butter completely into the flour mixture until the texture is like sand. A handful of the mixture should hold together when squeezed inside your fist.
- Scoop a little more than half the crust mixture into the prepared baking pan then press down firmly with the bottom of a measuring cup or glass to create an even layer. Pour the blueberry mixture over the top then spread into an even layer. Squeeze handfuls of the remaining crust mixture into clumps with your hands then crumble evenly over the blueberry filling.
- Bake for 38-40 minutes or until the top is golden brown, rotating the baking pan 180 degrees halfway through. Check on the bars at the halfway mark — if the top is browning too quickly, place a piece of foil on top of the baking dish — no need to crimp. Remove the foil for the last 10 minutes of baking time so the top becomes golden brown.
- Cool bars completely then let sit for at least 12 hours before slicing and serving. Store in the refrigerator for up to three days, or freeze for up to 6 months. Thaw in the refrigerator.
Notes
- I like Bob’s Red Mill Gluten Free 1-to-1 Baking Flour for these bars. Your results may vary if using a different GF flour blend.
- Use the “scoop and level” method of measuring flour for the best results, vs dipping the measuring cup directly into the flour. Add a spoonful of flour one at a time into your measuring cup until it’s heaping over the top then use the back of a butter knife to level it off.
Nutrition
Nutritional values are estimates only. Please read our full nutrition information disclaimer.
Photos by Ashley McLaughlin


These bars are fantastic! I was hesitant to try these as I tend to worry that pastry-heavy GF recipes won’t be great (and a lot of work) – but wow, this one was both great and not too much work! I used Bob’s Red Mill flour with no thickener, so added 3/4 tsp xanthan after doing some research and it was perfect. I also just sprinkled the topping on instead of clumping it and we all loved it.
I made them early yesterday morning, and let them sit for the day as you recommended. They were perfect by after dinner for dessert.
Not sure how you come up with all these great recipes Kristin!! There are so many of yours that have become family staples at my house. Thanks for the amazing work, sweat and dedication. It’s a gift to all of us who have discovered you!!
I’m so, so glad you loved these, Karine!! And I love that you waited the full time between baking and slicing. I truly appreciate you cooking my recipes, plus your feedback. Many thanks!
Can I use cherries instead of blueberries
Hi Noa! I haven’t tried with this particular recipe, though I imagine it would work! I’d maybe slice the pitted cherries in half first.
Made these for the first time and they are delicious! Followed the recipe exactly except added 1/2 tsp almond flavoring with 1/2 tsp vanilla to the crust and used frozen blueberries. The crust & crumble topping have a shortbread texture. I’ve had trouble with other crusts in the past being too hard. This one is perfect- just don’t press down too hard for too long. I just finger pressed until it was smoothed out nicely. Cooked for 38 minutes @ 325 convection.
SO glad you loved this recipe, Susan! Thank you so much for your feedback and recipe rating!
Can regular flour be used?
Hi Debbie! I have Celiac Disease and need to eat gluten free so unfortunately I can’t test these bars with regular flour to see if the measurements are the same.
Can you use Non-Dairy or plant based butter alternatives instead of the butter?
Yes that should be fine! :)
Can you use frozen blueberries?
Yes, that’s fine! You might need to tack on a bit more baking time!