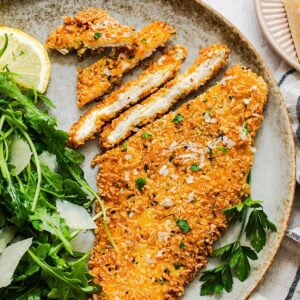
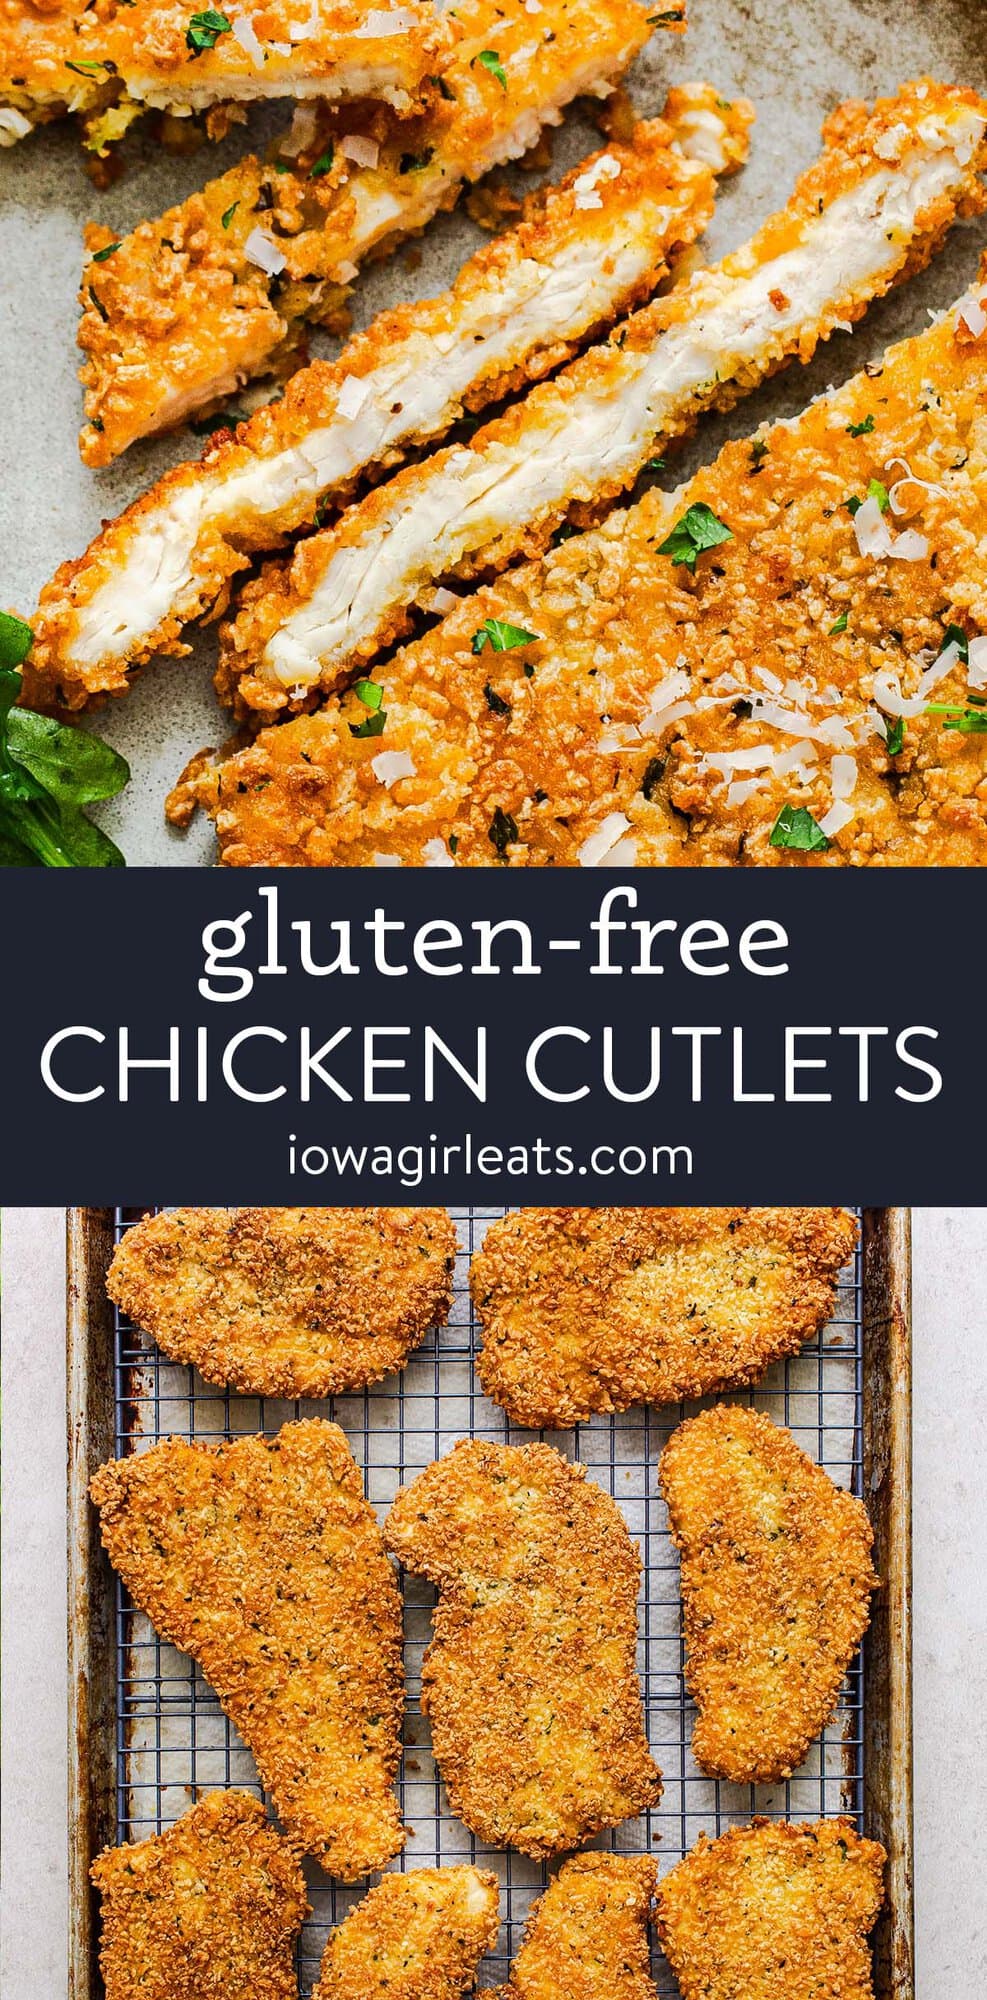
Audibly crispy on the outside, and super tender on the inside, Gluten Free Chicken Cutlets are mouthwatering, cook in minutes, and go with everything!
“This method of preparing the chicken is kind of life changing. Thank you!”
A friend and I were recently talking about how we’re in a cooking rut. It’s the end of the school year, everyone’s sick of the same meals, schedules are crazy, and we don’t have a ton of time to devote to dinner.
It’s giving stale and stressful.
Thank goodness for super-crispy, extra-tender Gluten Free Chicken Cutlets. This classic dish is mouthwatering and audibly crunchy, incredibly versatile, and cooks in minutes.
Enjoy chicken cutlets hot, warm, or cold. Fresh, reheated, or straight out of the fridge. You are going to love this rut-busting, gluten-free chicken recipe!
Watch How to Make It
What are Chicken Cutlets?
Chicken cutlets are slices of chicken breast that are pounded thin, coated in seasoned breadcrumbs, then pan-fried until golden brown. Think the best chicken nugget of your life, but thinner and crispier.
What makes these cutlets – a cut above the rest – is they’re extra tender thanks to a special way of slicing the chicken, which I’ll share below.
Chicken cutlets are fantastic for dinner, but also snack time. My kids love when I have one or two on a plate waiting for them after school!
Why You’ll Love This Recipe
- Easy. This is a great recipe for kiddos who want to get involved in the kitchen. #serenitynow
- Extra-tender. Thanks to a simple trick in cutting the chicken, the cutlets come out super tender, like chicken tenders. I’ll share the tip below!
- Quick-cooking. We’re talking 2 minutes per side.
- Versatile. Dip the cutlets into ketchup or BBQ sauce, top with a simple salad, or slather with marinara sauce and mozzarella cheese. Find more ideas below.
- Reheatable. Chicken cutlets are irresistible while they’re hot and fresh, but they also reheat really well in the air fryer.
- Gorgeous: As much as I love tossing these to my hungry kids, they’re impressive enough to serve to guests or for a special occasion.
Pin this now to find it later
Pin ItMain Ingredients Needed
Raid your fridge and pantry for the everyday gluten-free ingredients needed to whip up a batch of crispy chicken cutlets:
- Chicken breasts: sliced then pounded thin, seasoned, coated, and pan-fried.
- Gluten-free flour: is the first step in breading the cutlets. Use what you typically reach for when cooking or baking – save your fancy GF flours.
- Gluten-free panko-style breadcrumbs: add an audible crunch to each bite. I like Kikkoman best for this particular recipe.
- Parmesan cheese: adds to the savory crispiness of the breading.
- Seasonings: salt, pepper, dried parsley, dried basil, and garlic powder season the breading.
- Eggs: help the breadcrumbs adhere to the chicken cutlets.
- Oil: extra virgin olive oil plus a neutral-tasting oil like canola, vegetable, or avocado oil ensure the cutlets sizzle to golden brown perfection.

How to Use Chicken Cutlets
As I mentioned, there are a million and one ways to use chicken cutlets – including simply serving them with your favorite dipping sauce. Here are a few more ideas:
- Buffalo Chicken Caesar Wrap: toss chopped chicken cutlets in buffalo sauce then wrap in a gluten free tortilla with Caesar salad.
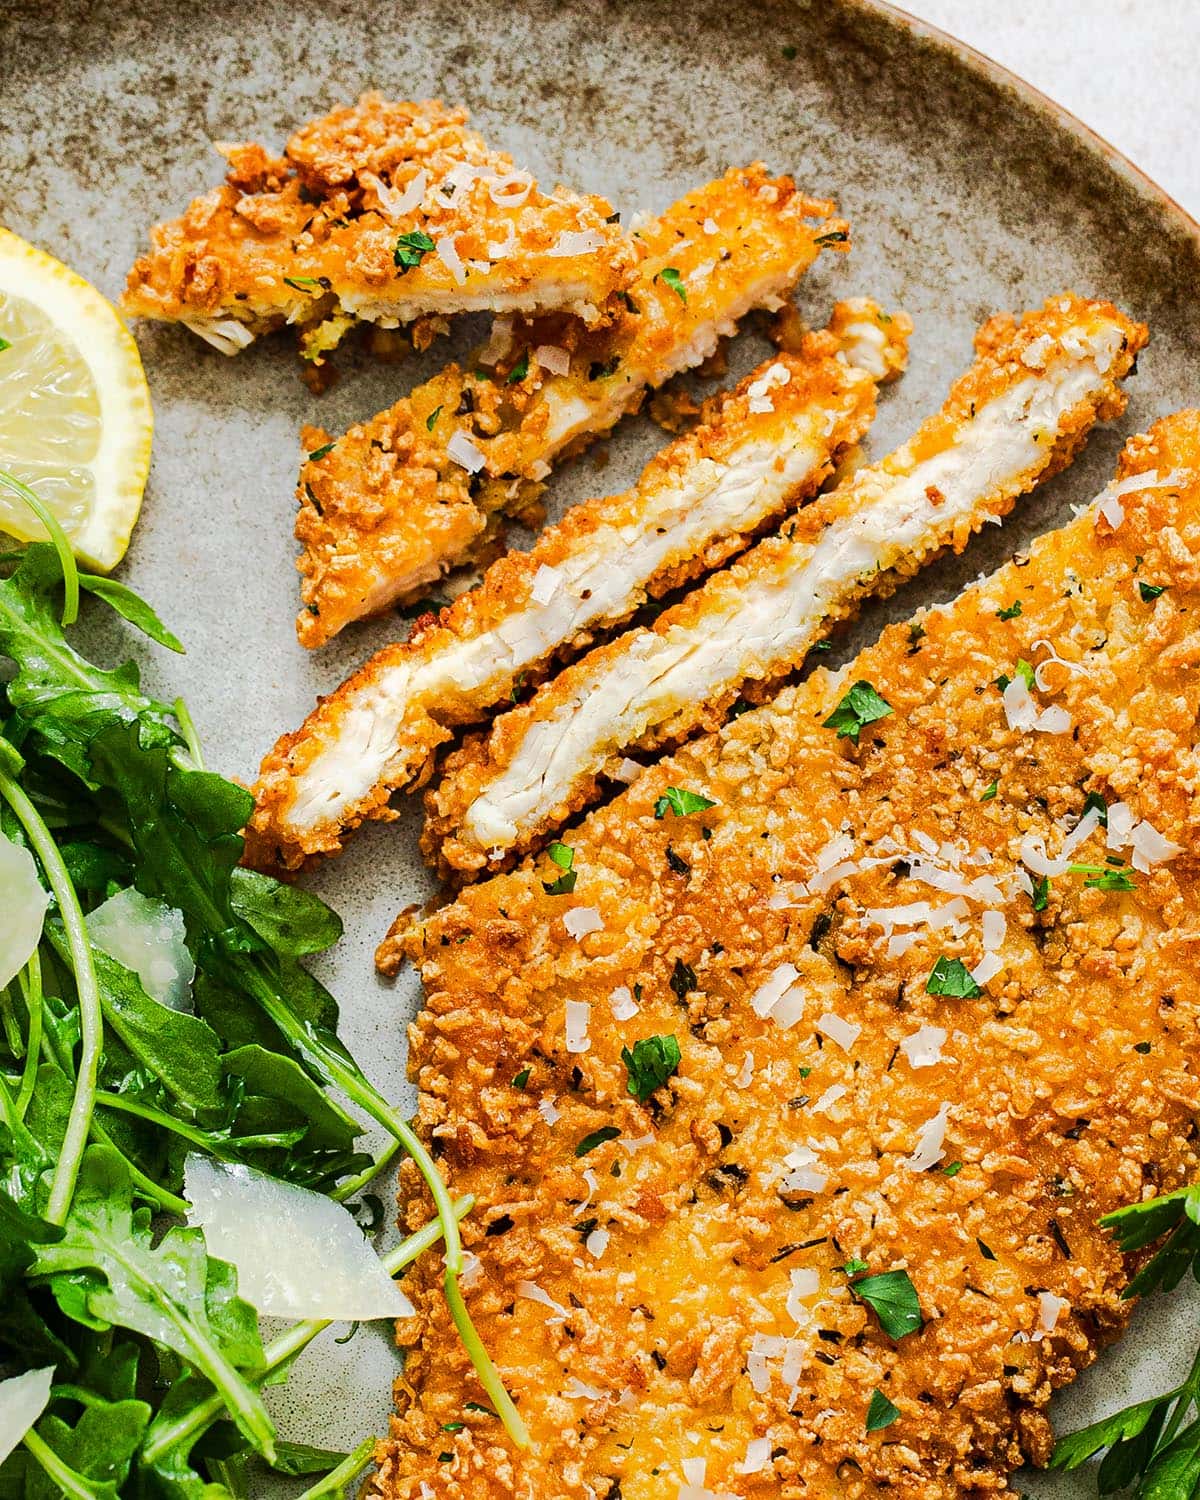
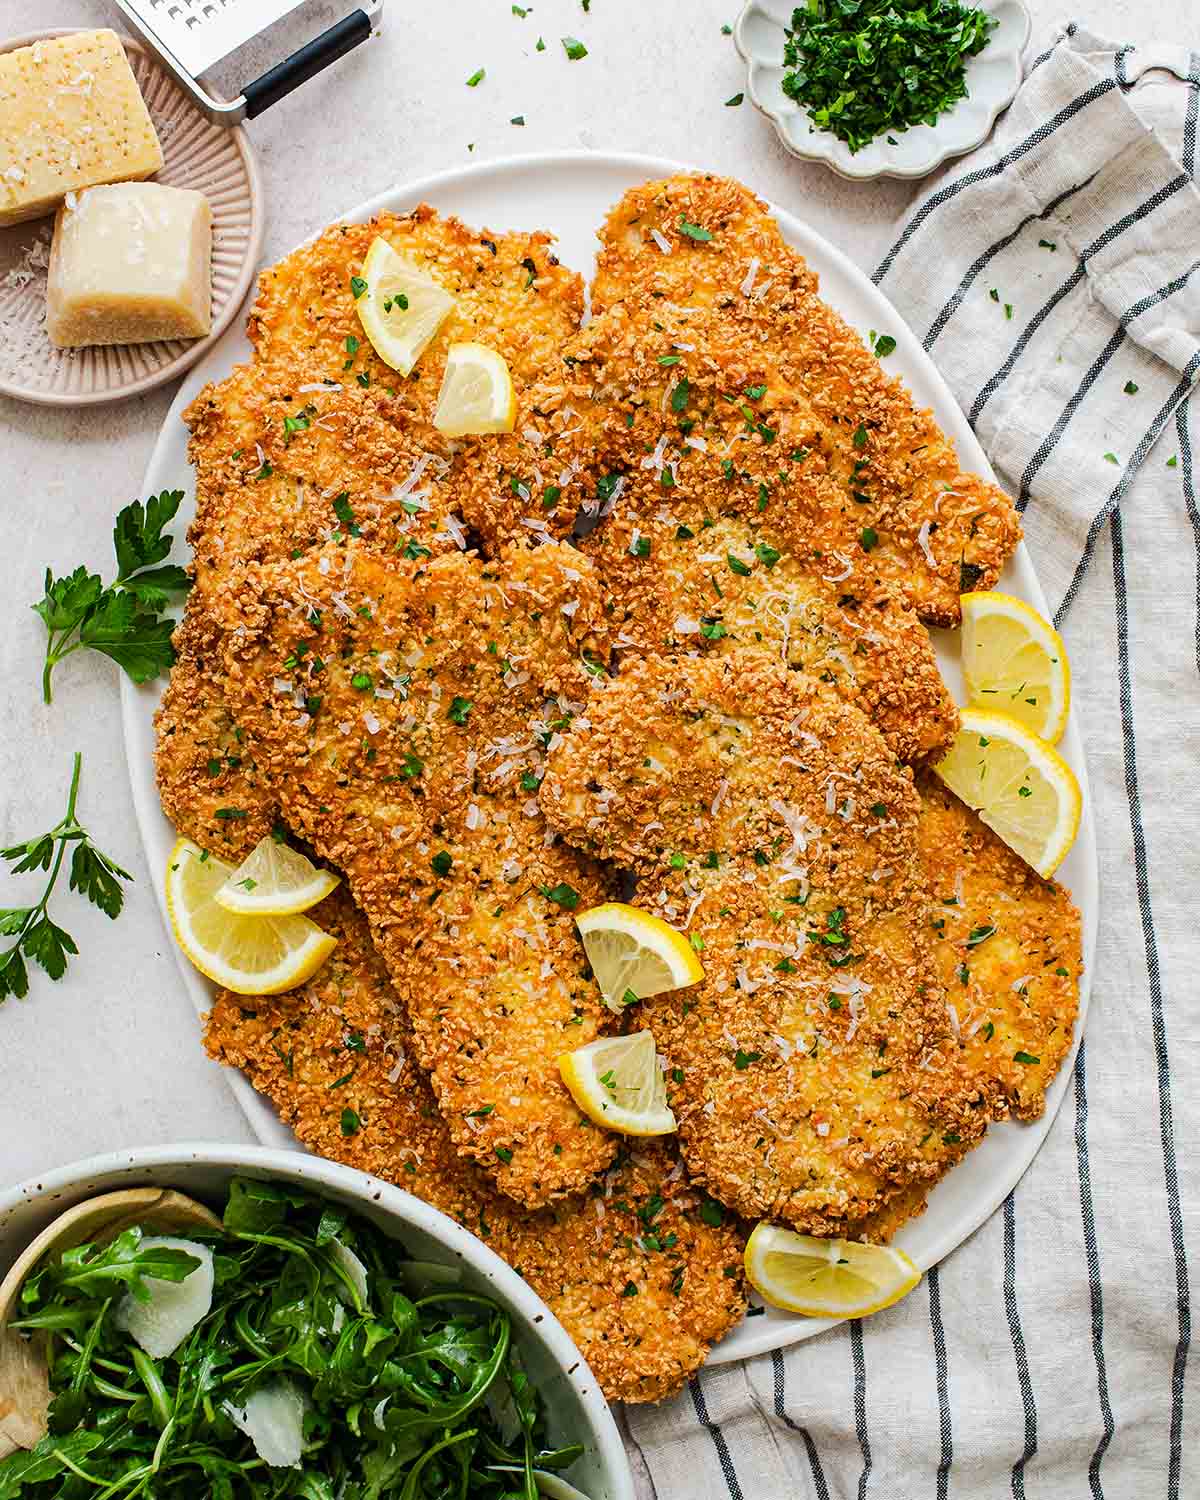
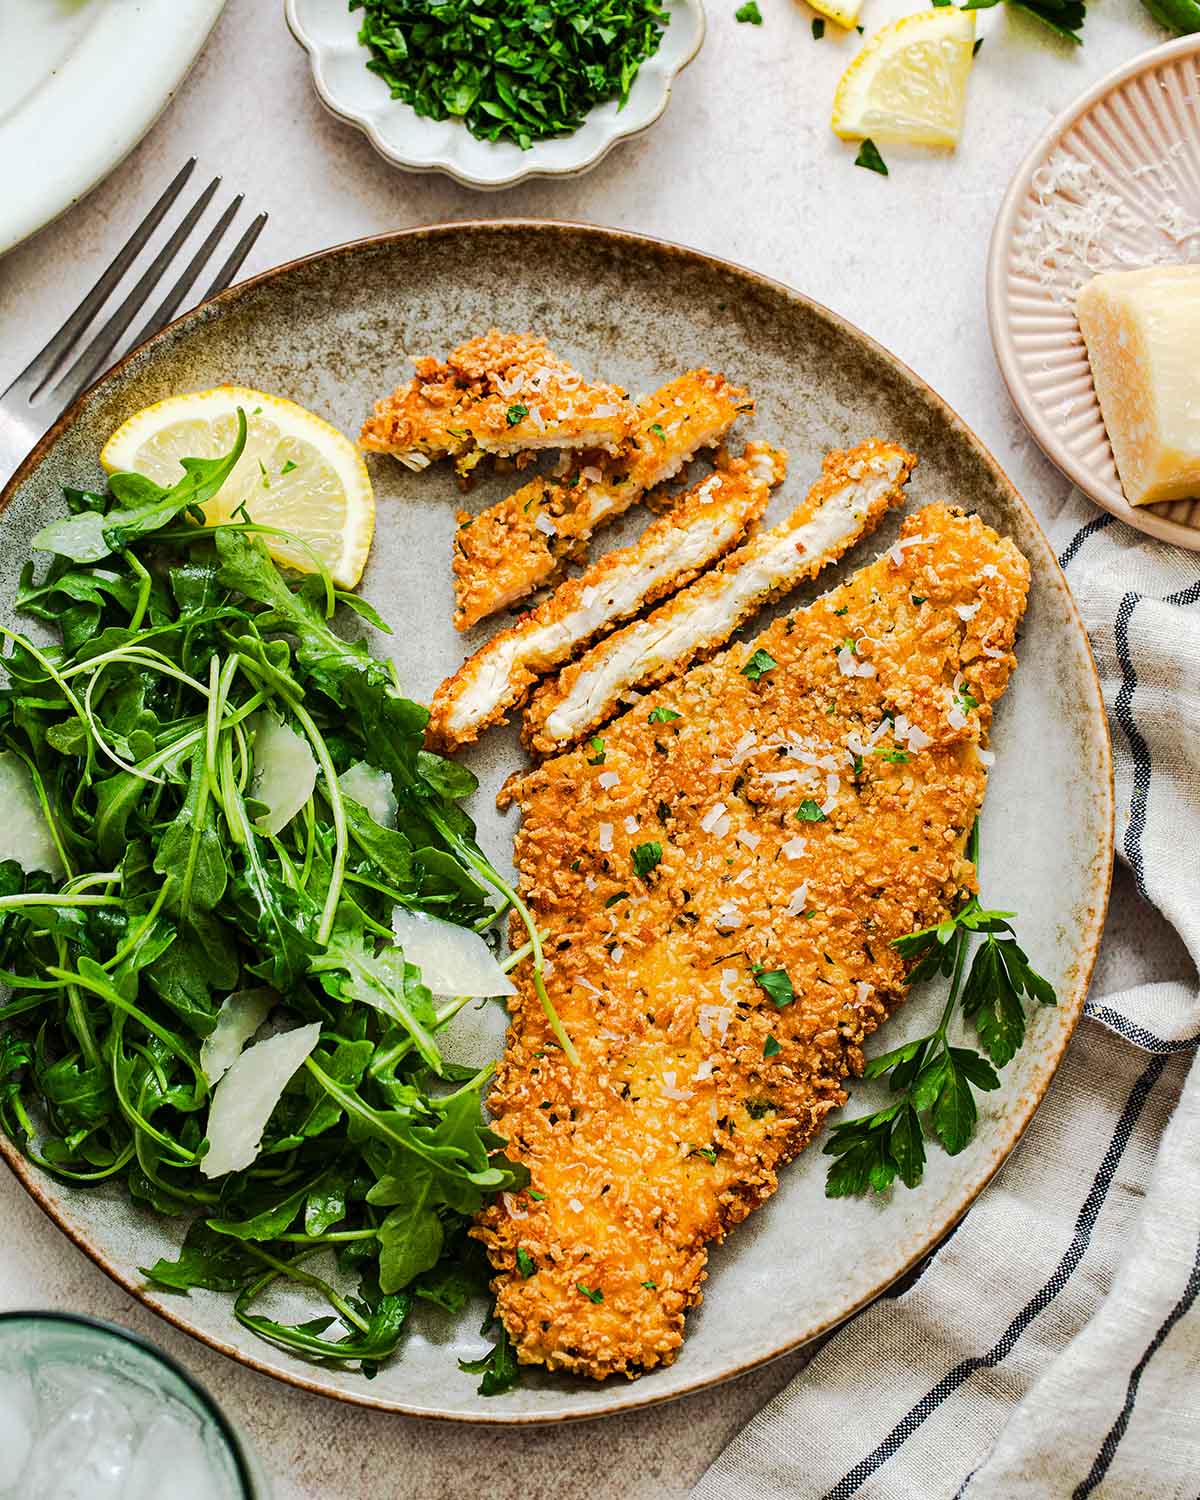
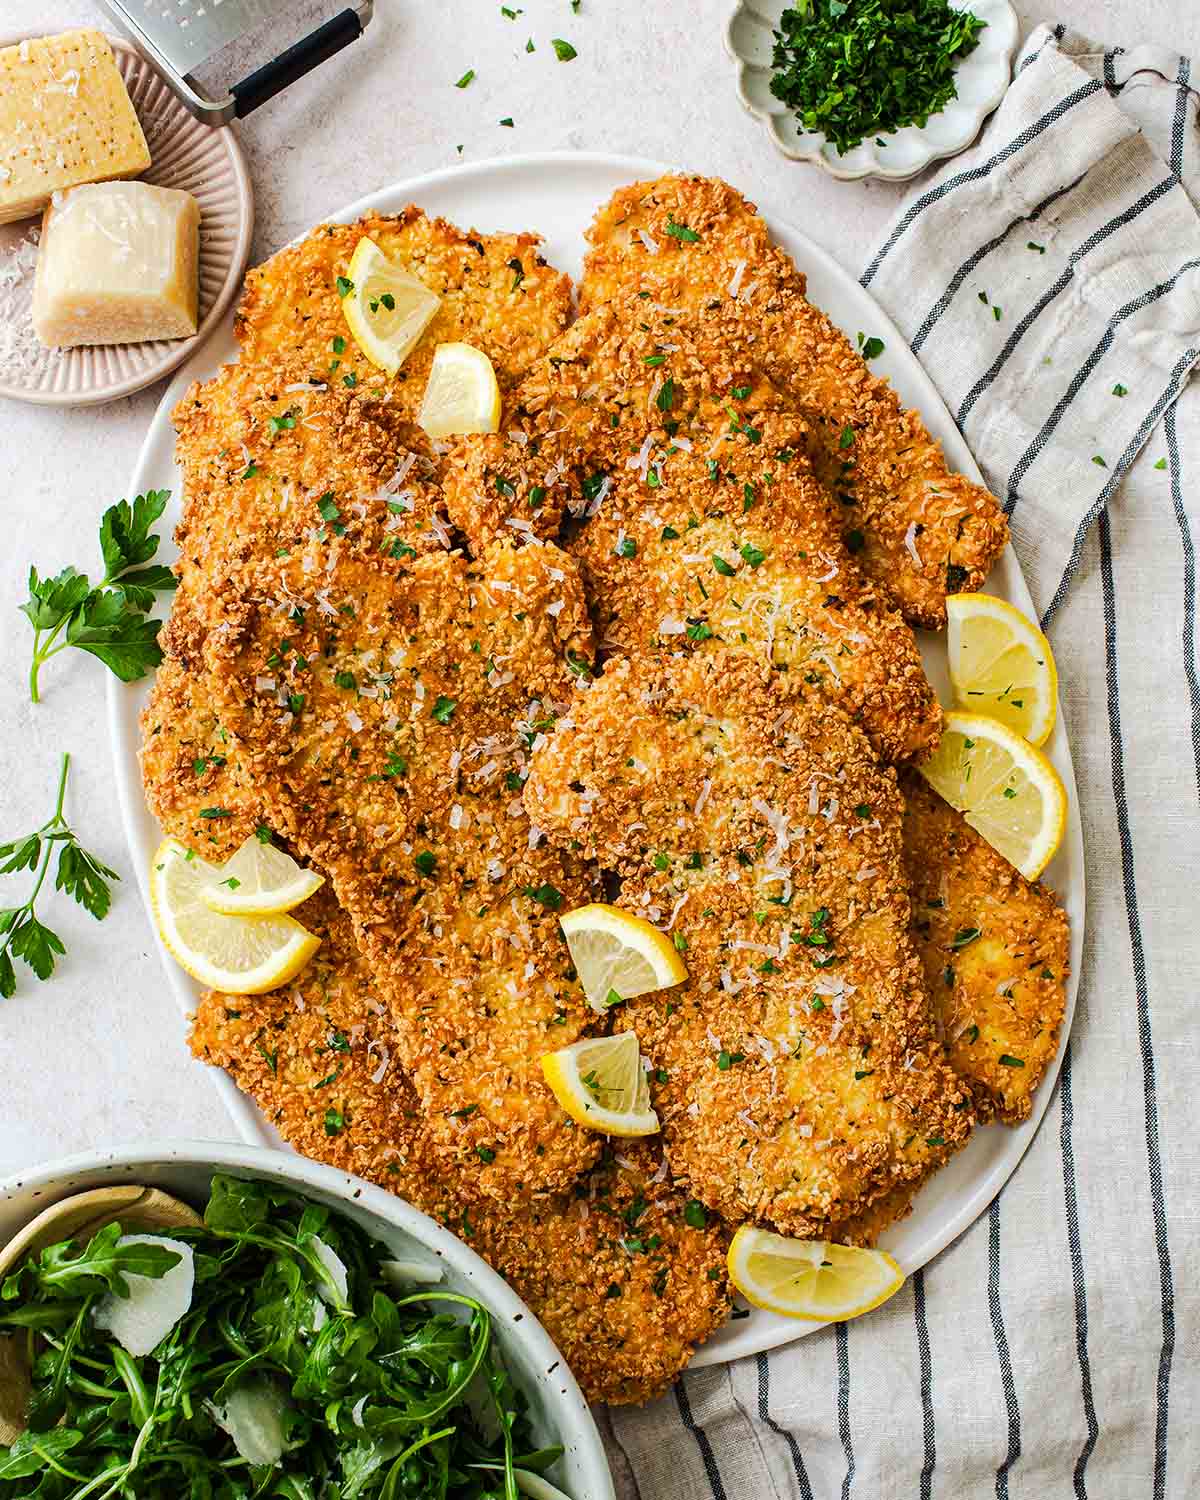
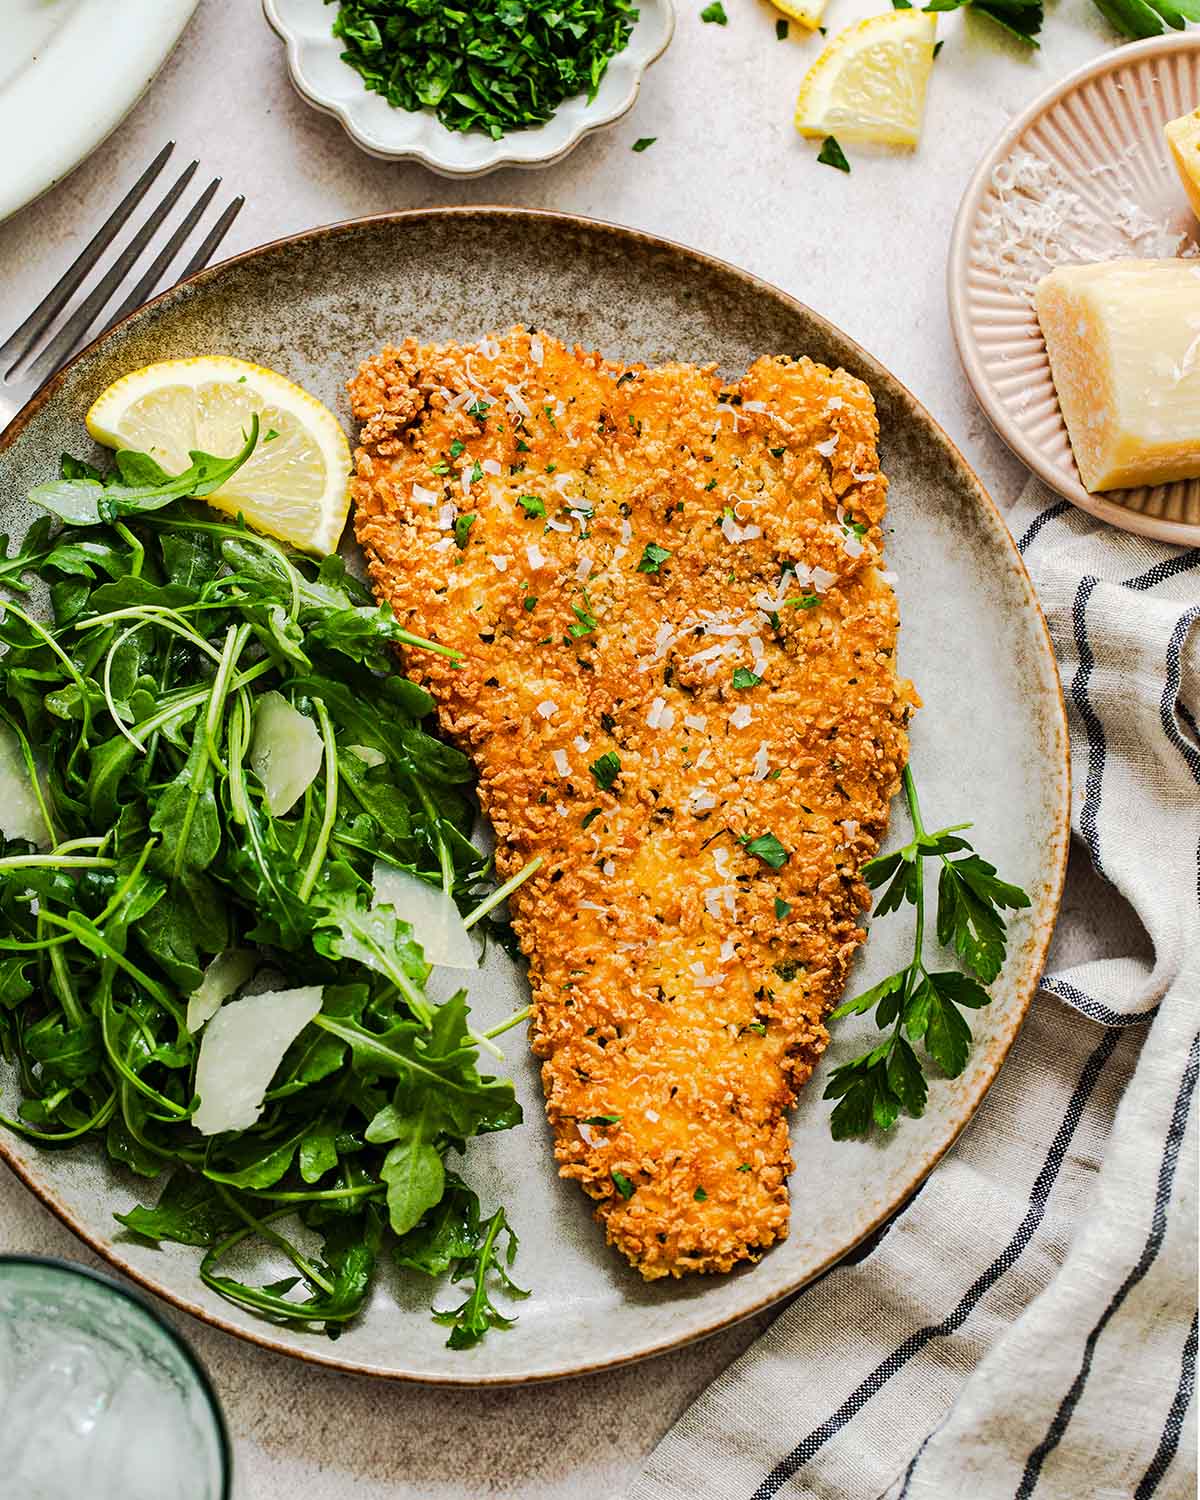
- Chicken Milanese: top crispy chicken cutlets with arugula dressed with lemon juice, extra virgin olive oil, salt, and pepper, and shaved parmesan cheese.
- Chicken Caesar Cutlets: top warm cutlets with cold Caesar salad.
- Chicken Parmesan: spread warm marinara sauce over the cutlets then top with shredded mozzarella cheese. Broil until hot and bubbly then serve with spaghetti.
- Chicken Cutlet Pizzas: spread warm pizza sauce over the cutlets then top with shredded mozzarella cheese and pizza toppings. Broil until hot and bubbly.
- Crispy Chicken Sandwiches: place the chicken cutlets on gluten-free buns with sliced pickles.
- Pesto Chicken Cutlets: spread fresh pesto over the cutlets then top with shredded mozzarella cheese. Broil until hot and bubbly.
- Slice then add to salads like Kale Salad or Apple Orchard Salad, or pasta like Sesame Peanut Noodles and Pasta Fresca.
- Serve over Healthy Mashed Potatoes with homemade Gluten Free Gravy.
All that said, I can’t emphasize enough how delicious these are all on their own. Perfectly seasoned and totally devourable!
Tips for Success
Keep these tips in mind when making gluten-free chicken cutlets at home:
- Pound thin. Pound the chicken cutlets as thin as possible without tearing through the chicken using a meat mallet. If you do tear through, you can mush the cutlet back together during the breading process.
- Wet hand + dry hand. When breading the cutlets, use one hand for the dry steps, and one hand for the wet step. Otherwise your fingertips will become a gloopy mess.
- Refrigerate. To ensure the breading doesn’t fall off the cutlets while pan-frying, they need to be refrigerated for 20-30 minutes after breading. Don’t skip this step!
- Heat. Don’t be afraid to adjust the heat under the skillet often while pan-frying the cutlets. Turn it up slightly after adding the chicken, then turn it down slightly after the cutlets begin to uniformly sizzle, etc.
- Don’t crowd the pan. Ensure the chicken cutlets aren’t overlapping in the pan so they come out crispy and golden brown.
Serve with Air Fryer Green Beans
How to Make Gluten-Free Chicken Cutlets
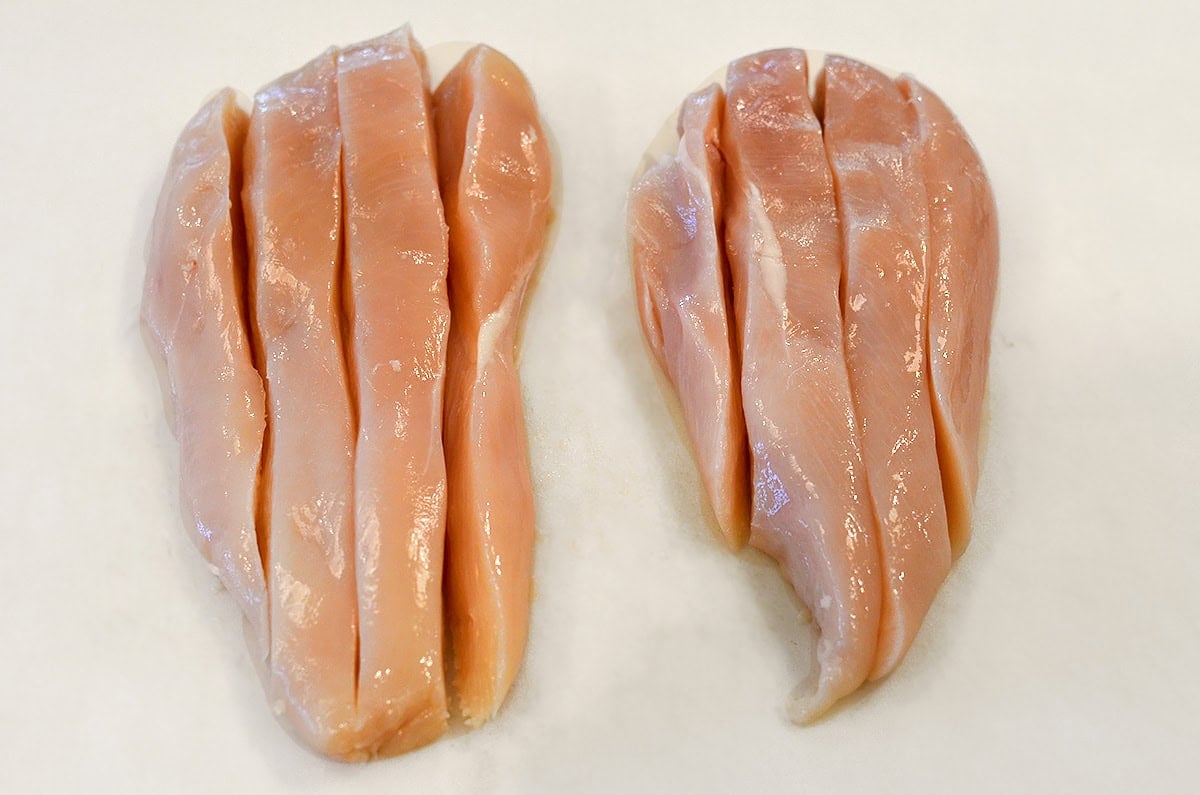
Step 1: Slice the chicken *lengthwise*.
Typically chicken breasts are sliced into thin cutlets widthwise, but TikTok creator Rita @Cucina Palemero shared a twist (which has gone mega viral) for slicing the chicken lengthwise before pounding them thin, resulting in extra-tender cutlets.
I could not WAIT to try this technique after seeing her video for the first time, and it’s such a game changer! Here’s how you do it:
Slice two, 8oz chicken breasts into 3/4 – 1″ thick slices. For an 8oz chicken breast, you’ll get 4 slices.
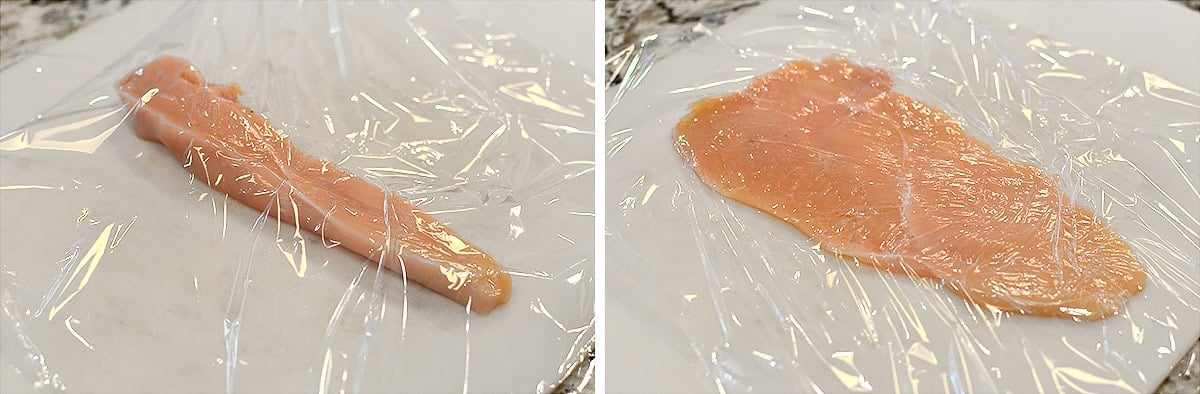
Step 2: Pound the chicken into cutlets.
Place a slice of chicken CUT SIDE UP on a cutting board then cover with a piece of plastic wrap. Use a meat mallet to gently pound the chicken as thin as possible without tearing it.
Recipe Tip
Use the meat mallet to gently pound down and out, vs just straight down, to spread the chicken as thinly and evenly as possible.
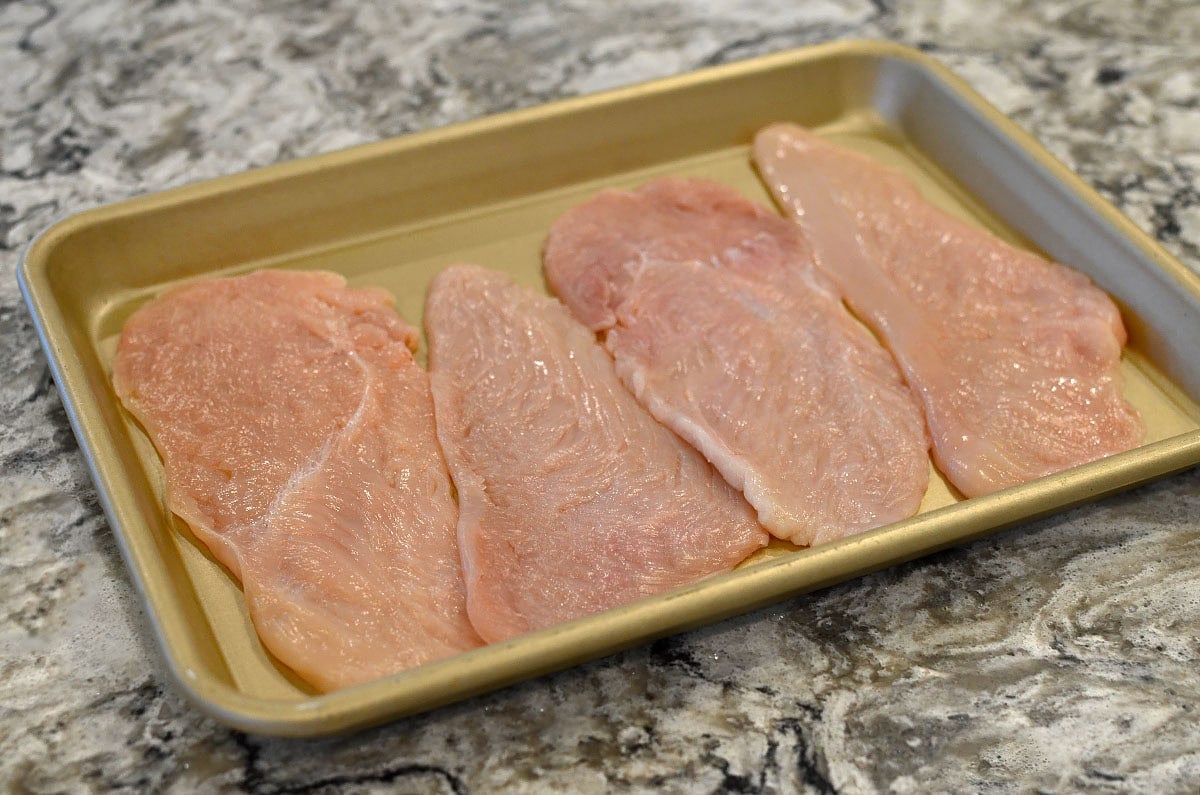
Repeat with the remaining slices then place the cutlets on a half or quarter-size sheet pan. Season lightly with salt and pepper then refrigerate while you prepare the breading.
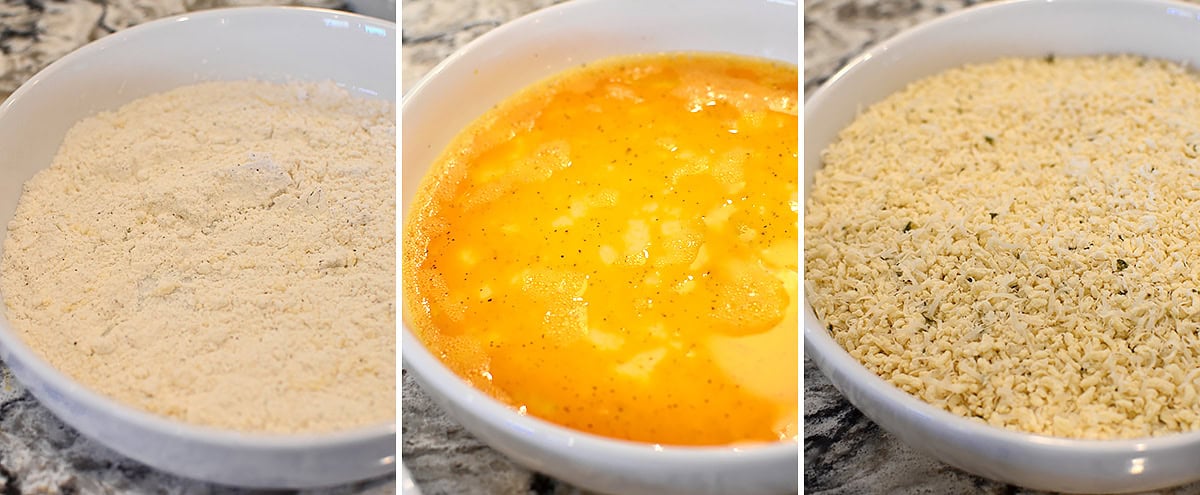
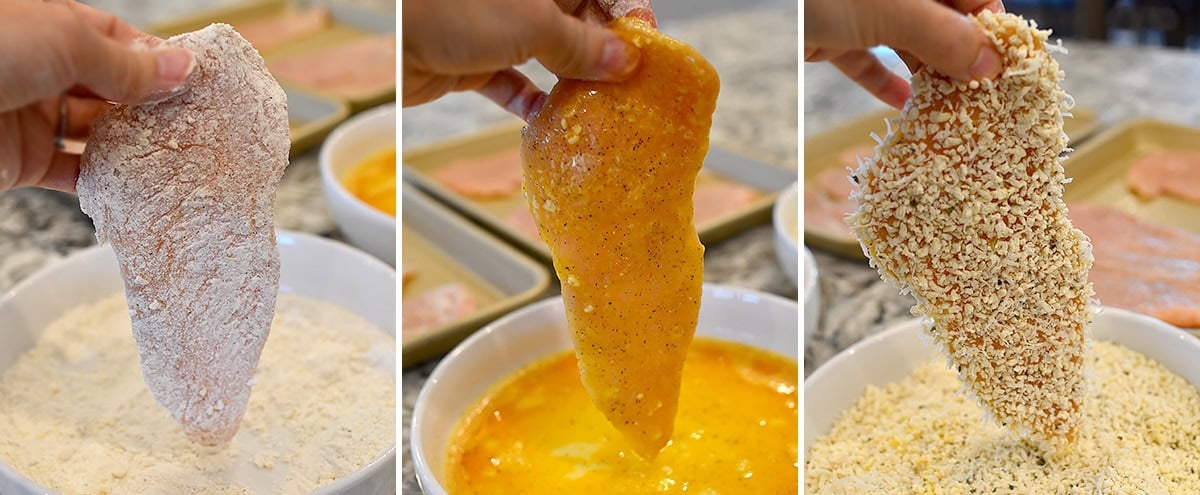
Step 3: Prepare the breading.
Chicken cutlets have a 3-step breading process. To three shallow bowls add:
- Gluten-free flour seasoned lightly with salt and pepper.
- Eggs and water seasoned lightly with salt and pepper.
- Gluten-free breadcrumbs plus parmesan cheese, dried herbs and seasonings.
Recipe Tip
If your two chicken breasts are larger than 8oz each, plan on having an extra egg and breading ingredients on hand to accommodate the extra chicken.
Step 4: Bread the cutlets.
- Use your left hand to dip one cutlet at a time into the seasoned flour then shake off any excess. Place it into the egg mixture
- Use your right hand to coat both sides of the cutlet in the egg mixture then let the excess drip off. Place it in the breadcrumb mixture.
- Use your left hand to coat each side of the cutlet in the breadcrumb mixture, pressing it into the chicken to ensure it sticks.
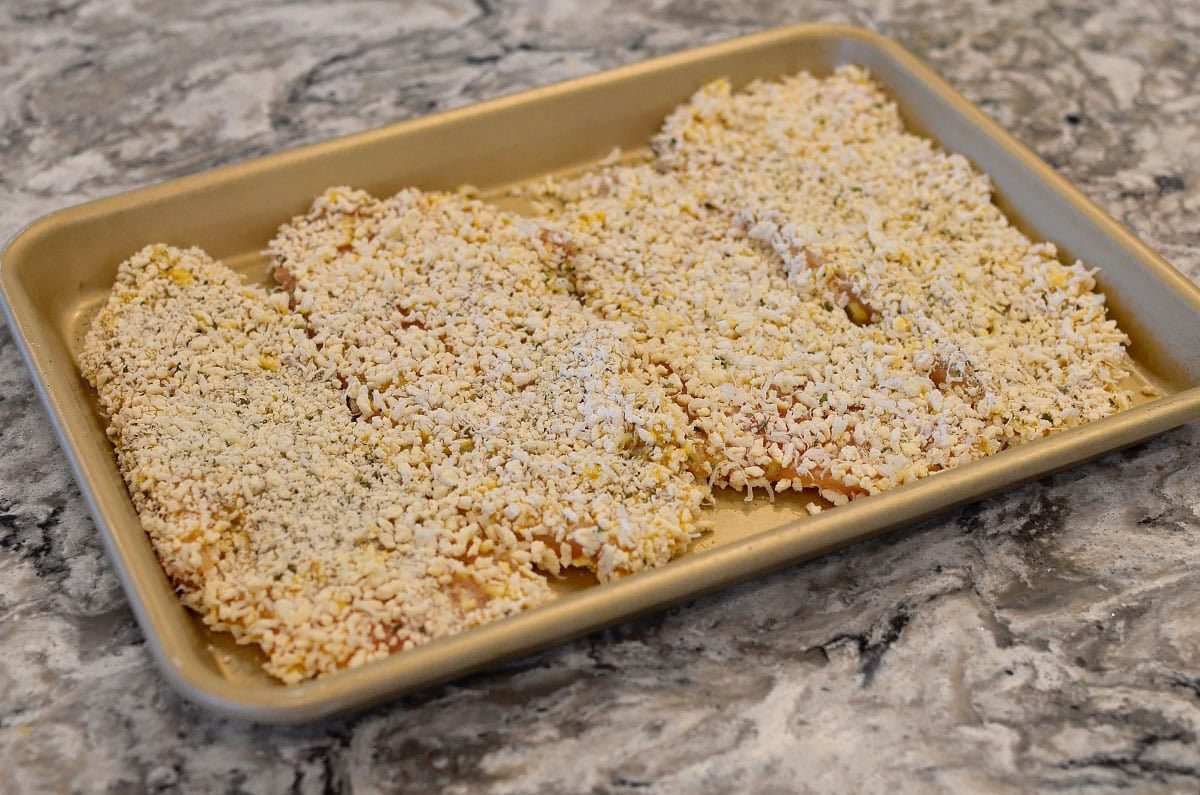
One by one, place the breaded chicken cutlets back onto the sheet pan then, once they’re all breaded, place the pans, uncovered, into the refrigerator for 20-30 minutes.
Recipe Tip
DO NOT SKIP the refrigeration step otherwise, the breading will fall off the chicken as it pan fries.
Step 5: Pan fry the chicken cutlets.
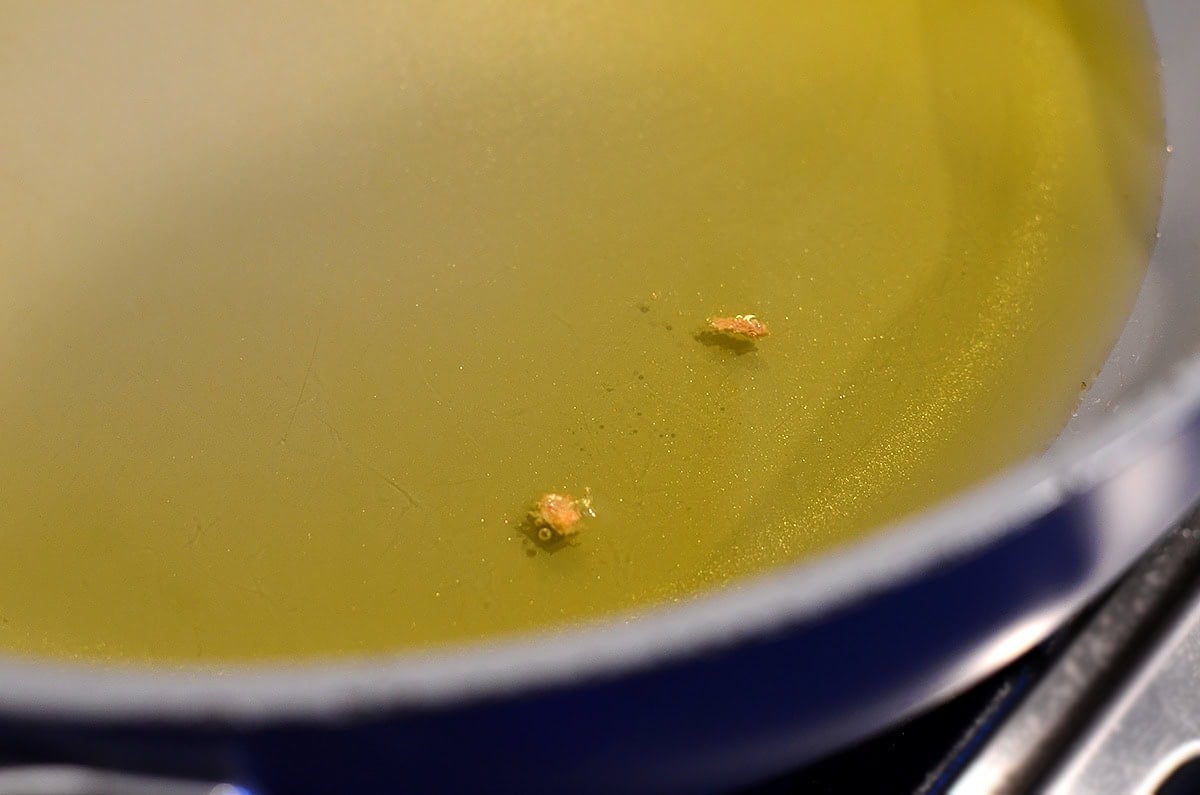
To a large pan with high sides, add extra virgin olive oil plus neutral-tasting, high-heat cooking oil like canola, vegetable, or avocado oil then heat it over medium-high heat.
The extra virgin olive oil is for flavor, and the high-heat cooking oil is so the evoo doesn’t burn.
Once hot, add a few crumbs of breading. If it pops and spits, the oil is too hot. If it sinks, the oil is too cool. If it sizzles, it’s ready.
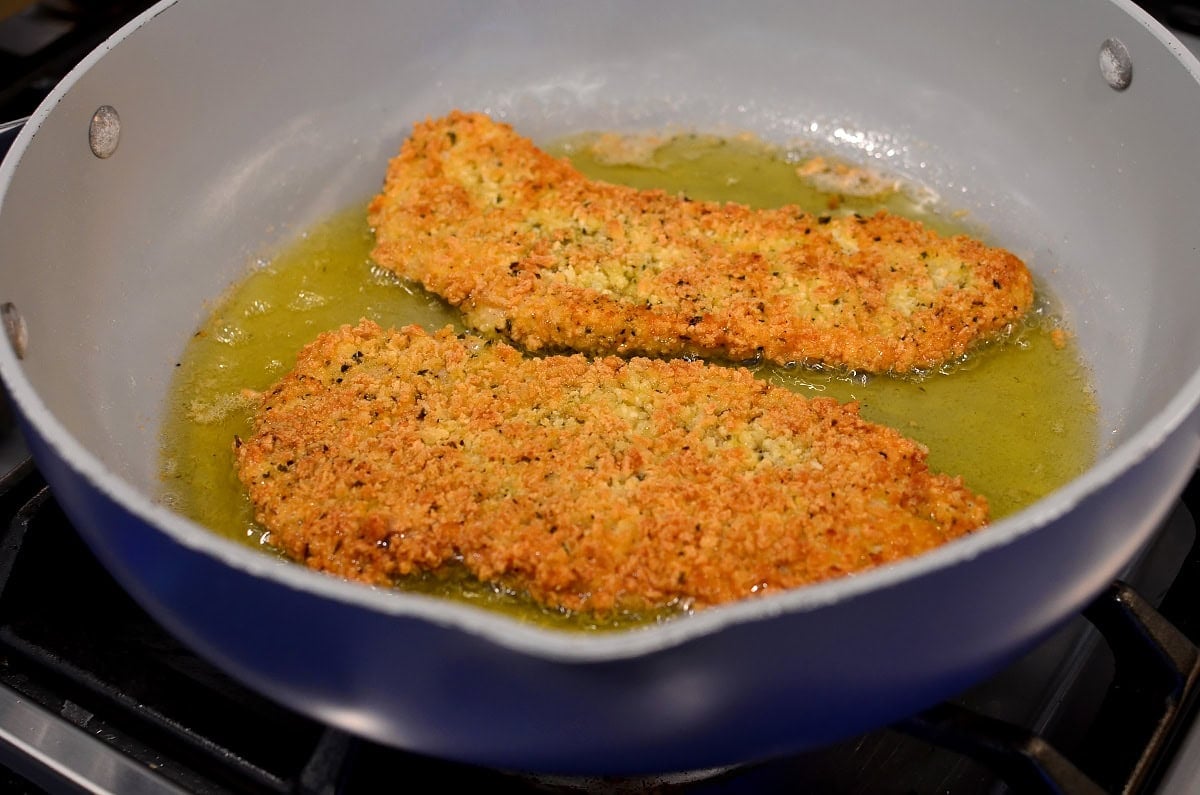
Working in batches, add the chicken cutlets into the hot oil, ensuring they aren’t overlapping or crowding each other in the pan.
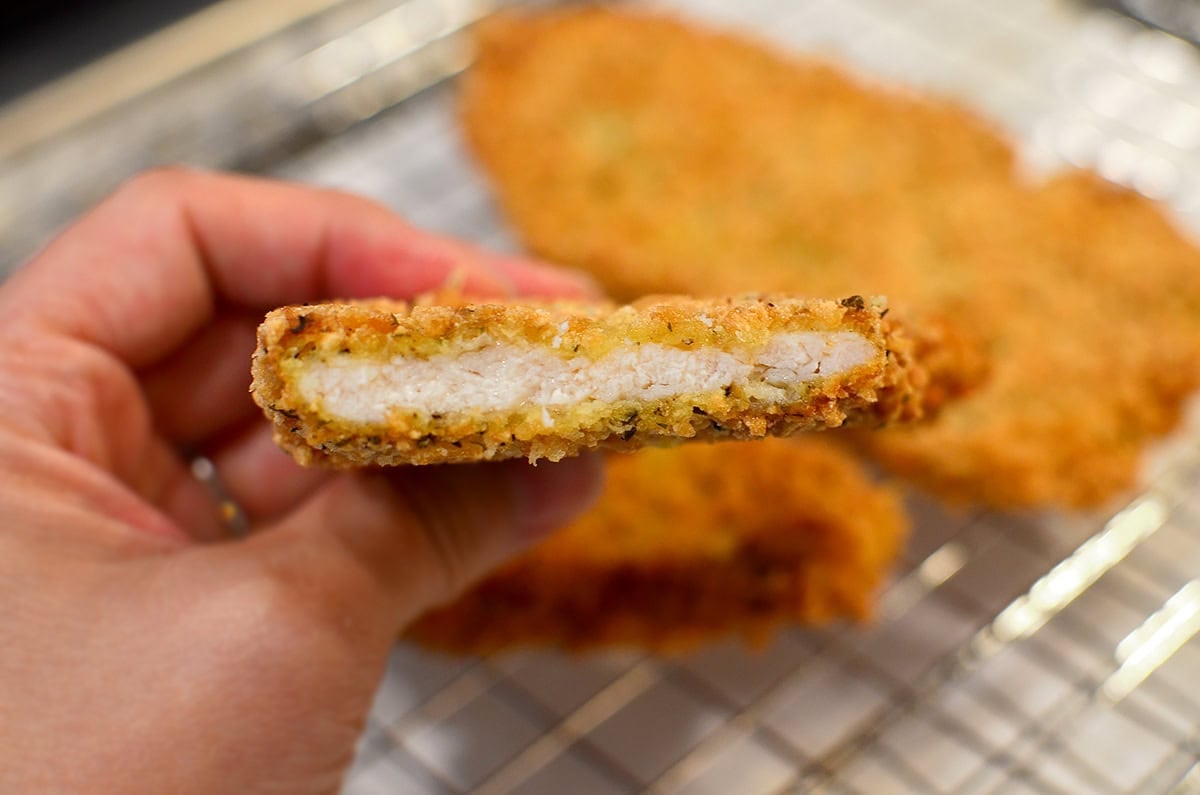
Pan fry until the bottom side is golden brown, 1 minute, then carefully flip and cook until the second side is golden brown, 1 minute.
Recipe Tip
Adjust the heat slightly up or down as needed during the pan-frying process to keep the cutlets evenly sizzling.

Next, flip the cutlet back over then fry for an extra 30 seconds – 1 minute per side, or until the breading is deep golden brown and the internal temperature of the chicken reaches 165 degrees.
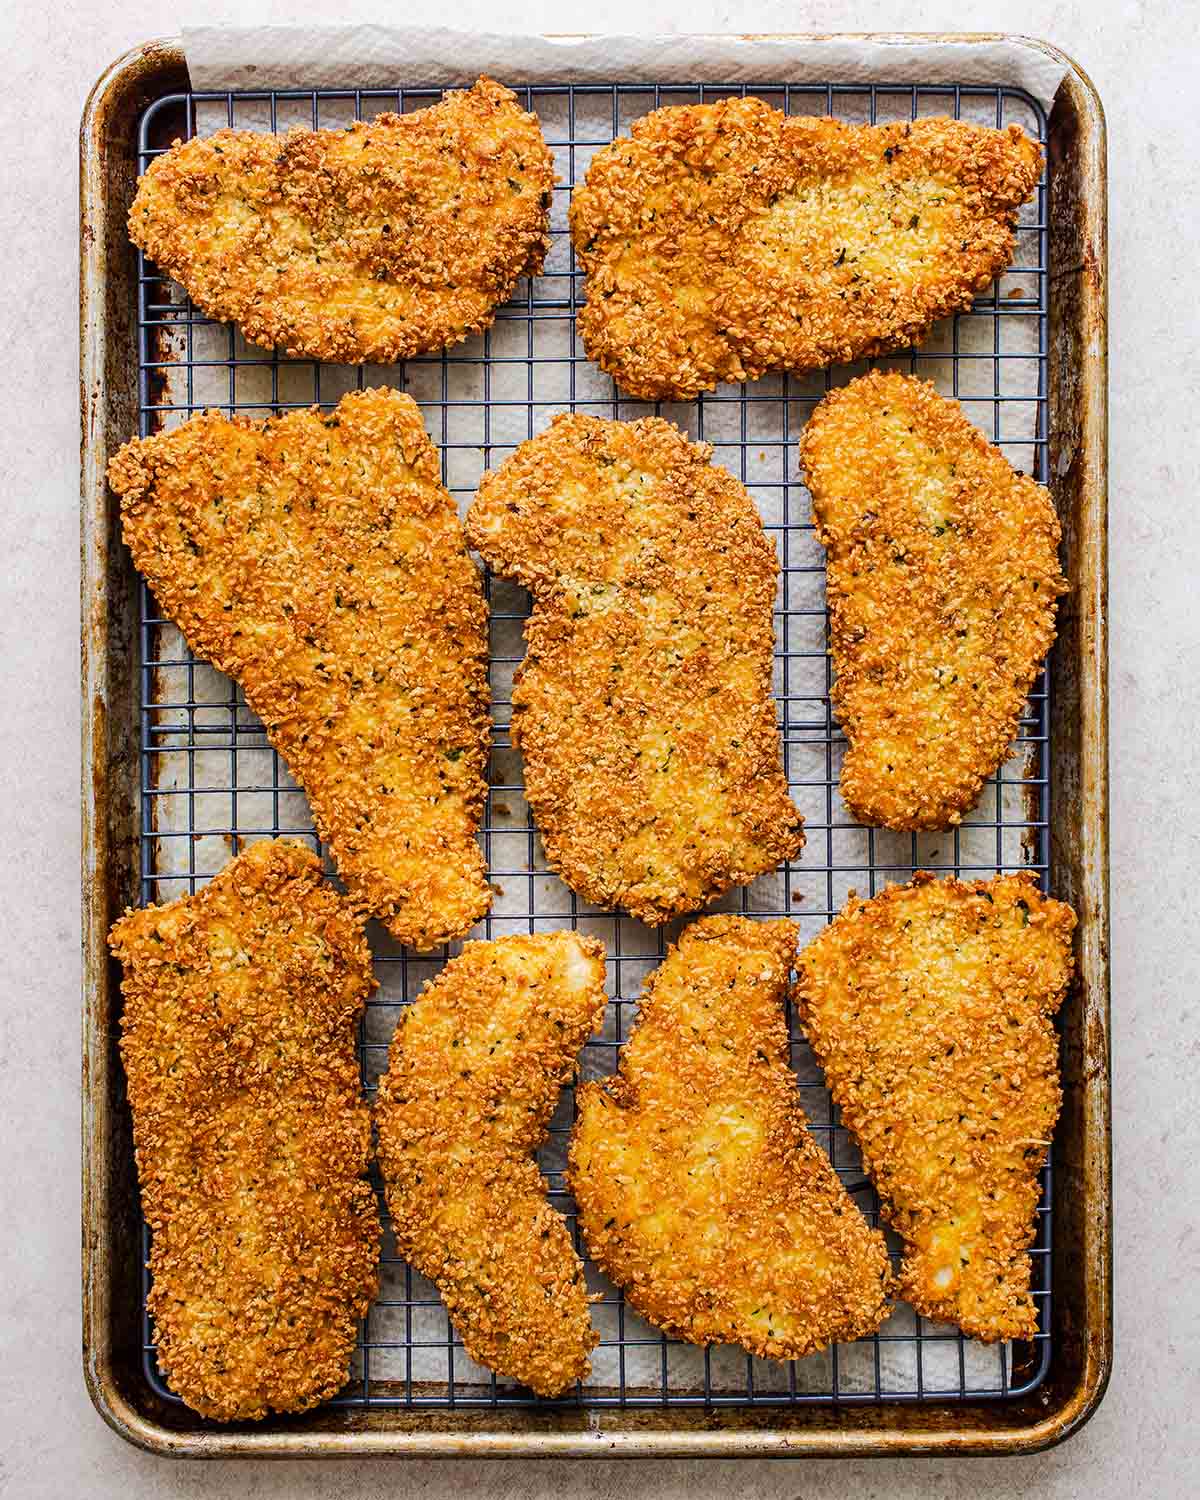
Transfer the cutlets to a cooling rack set atop a paper towel-lined half sheet pan then cook the rest.
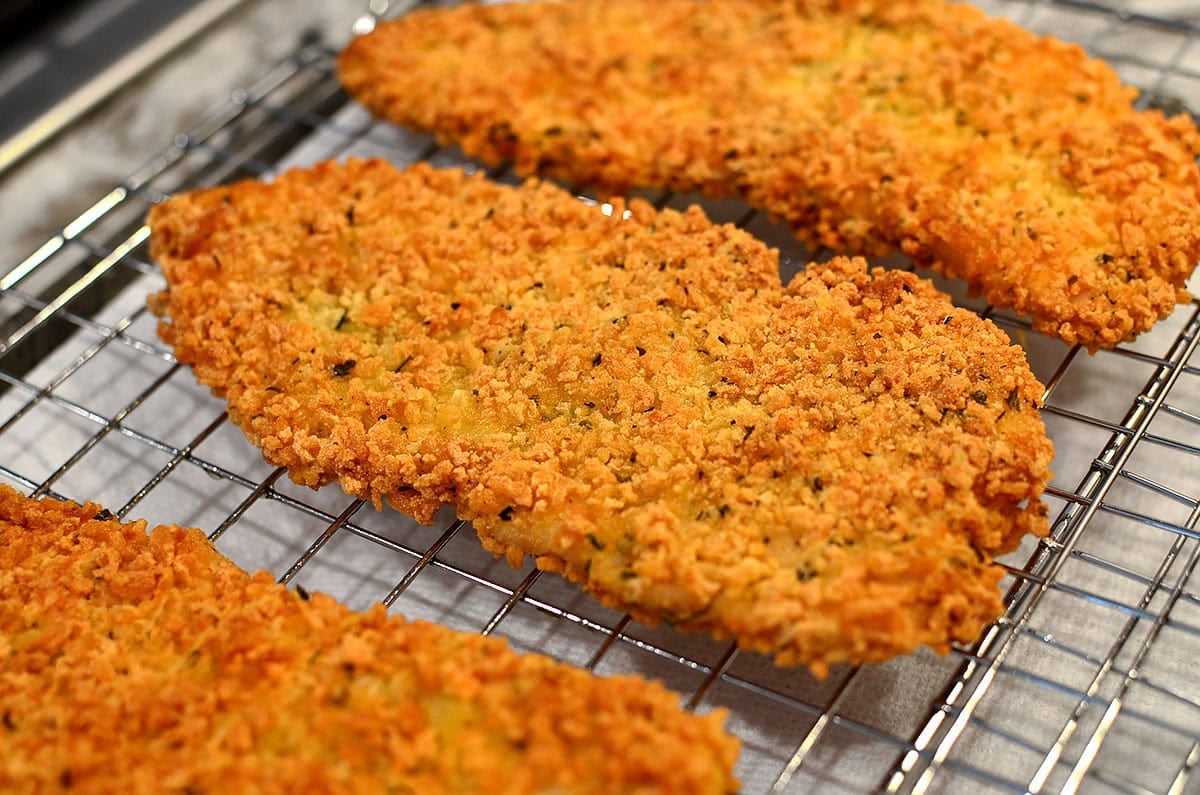
SO GOOD!
Serve right away or place the cutlets into a 250 degree oven for up to 1 hour to keep them warm. They do stay pretty hot for a while on their own though!
How to Make Ahead, Store, and Reheat
- Make ahead: bread the cutlets then cover with saran wrap and refrigerate for up to 24 hours.
- Store: store cooked chicken cutlets in the refrigerator for up to 3 days, or freeze for up to 3 months.
- Reheat: Air fry cold cutlets for 3-5 minutes at 390 degrees (or longer if frozen).
No matter how you serve them, I hope you love every tender, crispy bite of these rut-busting Gluten Free Chicken Cutlets. Enjoy!
More Easy Dinner Recipes
- Crispy Baked Chicken Thighs
- Homemade Crunchy Taco Hamburger Helper
- Chicken and Broccoli
- American Goulash
- One Pot Chicken and Rice
- One Pot Gnocchi Chicken Pot Pie
Equipment
Ingredients
- 2, 8 oz chicken breasts
- salt and pepper
- 1/2 cup gluten-free flour blend, see notes
- 1-1/2 cups gluten-free panko-style breadcrumbs, Kikkomen brand recommended
- 1/2 cup freshly grated parmesan cheese
- 1 teaspoon dried parsley
- 1/2 teaspoon dried basil
- 1/2 teaspoon garlic powder
- 2 large eggs
- 1/3 cup extra virgin olive oil
- 1/3 cup neutral-tasting high-heat cooking oil like canola, vegetable, or avocado oil
Directions
For the Chicken:
- Pat the chicken breasts dry with paper towels then slice them into 3/4 – 1" wide strips. You should get 4 slices per 8oz chicken breast.
- Working one at a time, place a strip CUT SIDE UP on a cutting board then cover with a piece of plastic wrap. Use a meat mallet to gently pound the strip down and out as thin as possible without tearing the chicken. Transfer to a large platter or half sheet pan then repeat with the remaining chicken strips. Season both sides of each cutlet lightly with salt and pepper then refrigerate while you set up the breading station.
For the Breading:
- Gluten free flour: to a shallow bowl, add the gluten-free flour then season lightly with salt and pepper and stir with a fork to combine.
- Gluten free breadcrumbs: to another shallow bowl, add the breadcrumbs, parmesan cheese, dried parsley, dried basil, and garlic powder then season lightly with salt and pepper and stir with the fork to combine.
- Eggs: to a third shallow bowl add the eggs and 1 Tablespoon water then season lightly with salt and pepper and whisk with the fork to combine.
- Line the bowls up in the following order: flour, eggs, breadcrumbs.
- Use your left hand to dip one cutlet at a time into the seasoned flour then shake off any excess. Place it into the egg mixture.
- Use your right hand to coat both sides of the cutlet in the egg mixture then let the excess drip off. Place it in the breadcrumb mixture.
- Use your left hand to coat each side of the cutlet in the breadcrumb mixture, pressing it into the chicken to ensure it sticks.
- Place the breaded cutlet back onto the platter/sheet pan then repeat with the remaining chicken. Once all the chicken has been breaded, refrigerate for 20-30 minutes. This is an essential step so the breading does not fall off the chicken while cooking.
To Cook:
- Line a half sheet pan with paper towels then place cooling racks on top and set aside.
- Place the chicken cutlets on the counter to remove the chill while you heat the oil up.
- To a large, 12” skillet with high sides, add the oils then place over medium-high heat. Once the oil is hot, drop in a bit of the breadcrumb mixture to test it. If it pops and spits, the heat is too high. If it sinks, it’s too cold. If it sizzles, the oil is ready.
- Add 2 – 3 chicken cutlets into the hot oil – don’t crowd the pan. Turn the heat down slightly once the cutlets start uniformly cooking, and continue to adjust the heat up or down while cooking as needed to maintain a steady sizzle.
- Cook until the cutlets are golden brown on one side, 1 minute, then flip and cook until the second side is golden brown, another minute or so. Flip each cutlet back over then cook for another 30 seconds – 1 minute per side, or until the cutlets are deep golden brown and cooked to an internal temperature of 165 degrees.
- Transfer the cutlets to the prepared cooling rack to drain then repeat with the remaining chicken. Serve immediately or keep the cutlets warm inside a 250 degree oven for up to 1 hour.
Notes
- You can use your favorite gluten-free flour blend for this recipe. I typically use Bob’s Red Mill Gluten Free 1-to-1 Baking Flour.
- If your chicken breasts are larger than 8oz each, plan on having extra egg + breading ingredients on hand to accommodate the additional chicken.
- Estimated nutritional information includes all the oil.
Nutrition
Nutritional values are estimates only. Please read our full nutrition information disclaimer.
Photos by Ashley McLaughlin


Made these last night and they were great! I’m going to up the herb level next time and add some cayenne. This method of preparing the chicken is kind of life changing. Thank you!
LOVE to hear this, Jen! So glad that preparation tip was a hit. Thank you so much for your feedback and recipe rating!