Gluten Free Pizza Breadsticks are soft and cheesy, freezer-friendly, and best of all, EASY! Get your gluten free pizza fix in 20 minutes.

“So easy and absolutely incredible! My teenagers, my husband, we all loved them.”
If you’ve had to go gluten free for whatever reason, and have a pulse, I’m willing to bet you’d give your left arm for a hot, chewy, cheesy slice of hand-tossed pizza.
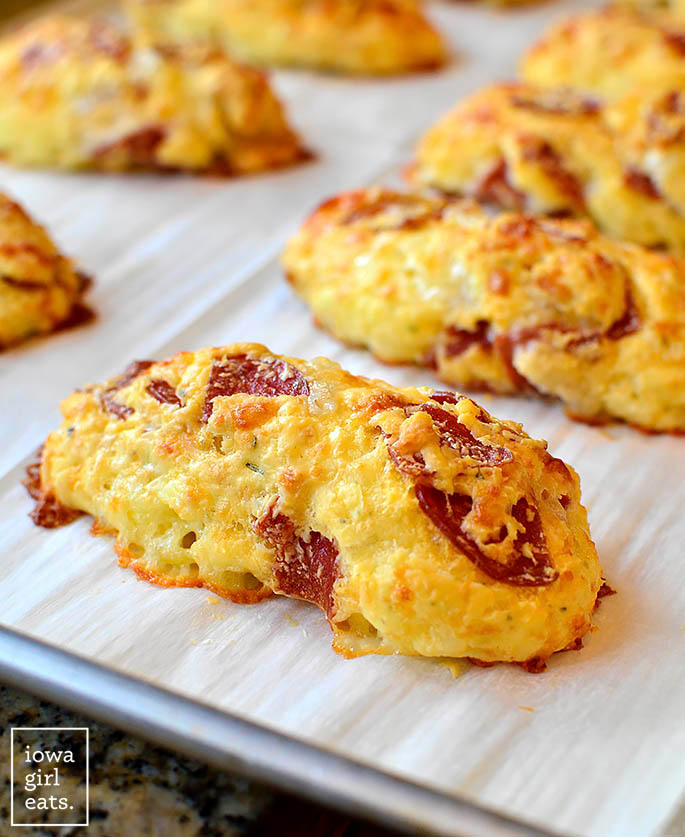
Well today I’m sharing the gluten free equivalent: Gluten Free Pizza Breadsticks! These breadsticks have all the flavor and chewy texture we love(d) about real pizza, in gluten free breadstick form.
They’re also yeast free, ready in under 20 minutes from start to finish, and freezer friendly. Plus they can be cooked in an Air Fryer. I cannot wait for you to sink your teeth into one!
Gluten Free Pizza Breadsticks
Tapioca flour, baking powder, garlic powder and Italian herbs are mixed with shredded cheese, your favorite pizza toppings, eggs, and butter then shaped into breadsticks and baked in the oven OR the Air Fryer. Either way, they don’t take longer than 10 minutes to cook.
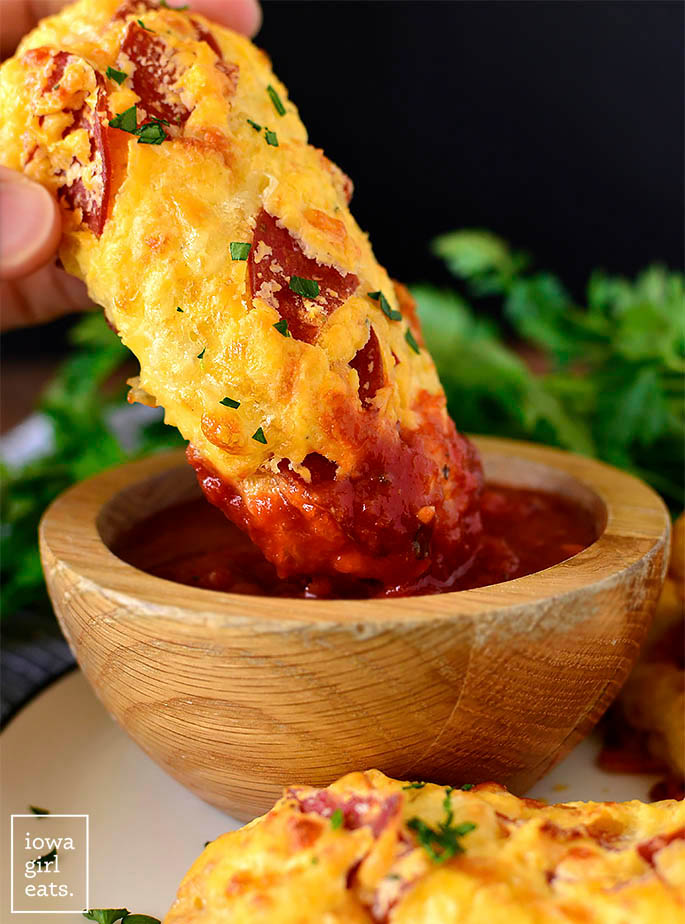
If you’ve ever had Brazilian cheese bread, these pizza breadsticks are a riff on those except they’re studded with pizza toppings then shaped into breadsticks for maximum dunkability into warmed marinara sauce or ranch.
Did I mention how fluffy and SOFT these breadsticks are? Just like pizza – and breadsticks for that matter – should be! No more cardboard gluten free pizza or worse, gummy gluten free pizza. Girl bye.
How to Freeze For Later
My kids and I had a blast recipe testing these pizza breadsticks over and over to get them just right.
That said, I froze some and can confirm they reheat beautifully either in the microwave or Air Fryer. Cook and cool the pizza breadsticks then freeze solid on the baking sheet. Transfer to a Ziplock freezer bag then reheat for 1 minute at 50% power in the microwave, or cook for a few minutes in the Air Fryer.
The BEST!!
Try Gluten Free Breakfast Bombs
How to Make this Recipe
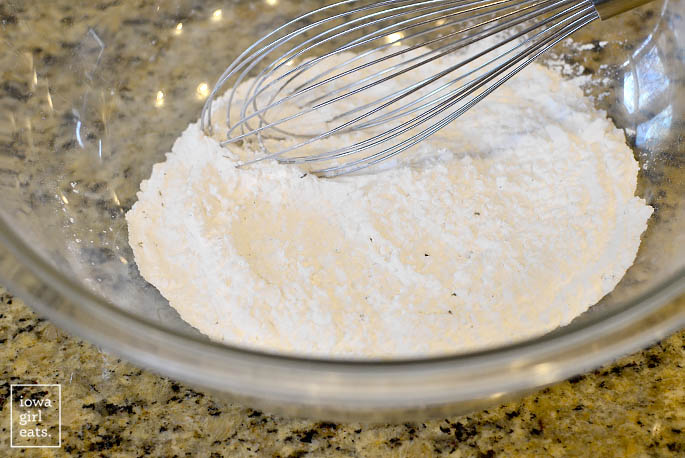
Step 1: Mix the dry ingredients.
Start by adding tapioca starch (sometimes labeled tapioca flour) to a large bowl with baking powder, garlic powder, and Italian seasoning.
Tapioca starch has a similar consistency to corn starch in that it will fly everywhere if you’re not careful, so use a whisk to gently stir everything together.
Can I substitute the Tapioca Flour?
The short answer is no.
Tapioca flour is what gives the breakfast bombs their irresistible stretch and chewiness – you wouldn’t achieve the same texture with either a gluten free flour bend, or all-purpose flour.
Furthermore, tapioca flour has different hydration needs, requiring slightly less liquid than all-purpose flour, for example.
TL;DR: do not swap the tapioca flour for something else in this recipe. Most grocery stores carry tapioca flour these days. I’ve used Bob’s Red Mill Tapioca Flour, and Anthony’s Organic Tapioca Flour with great results.
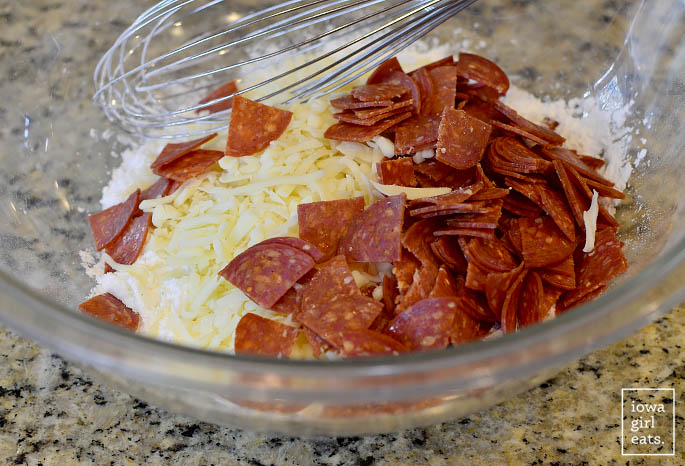
Step 2: Add pizza toppings.
Next add shredded mozzarella or an Italian blend cheese plus chopped pizza toppings (pepperoni, black olives, cooked Italian sausage, etc.) then whisk to combine.
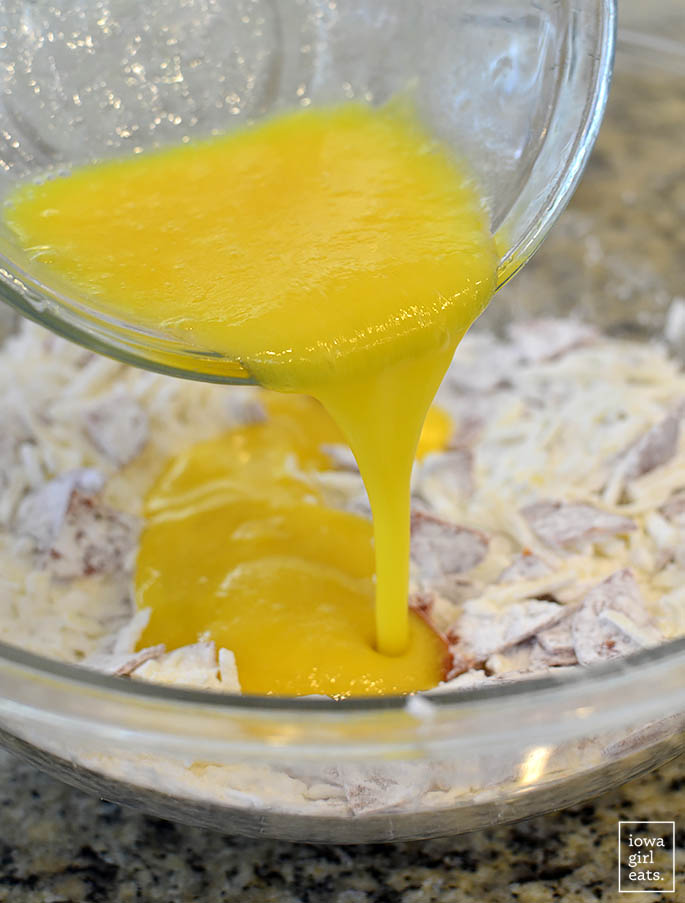
Step 3: Add the wet ingredients.
To the bowl add melted then cooled butter plus whisked eggs. Switch to a wooden spoon then stir everything until combined into somewhat of a thick paste.
The mixture shouldn’t be terribly sticky, and it will “dry” slightly after sitting for a minute or two.
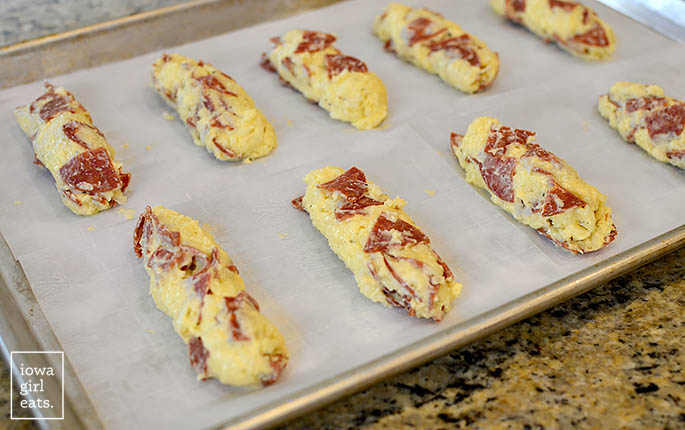
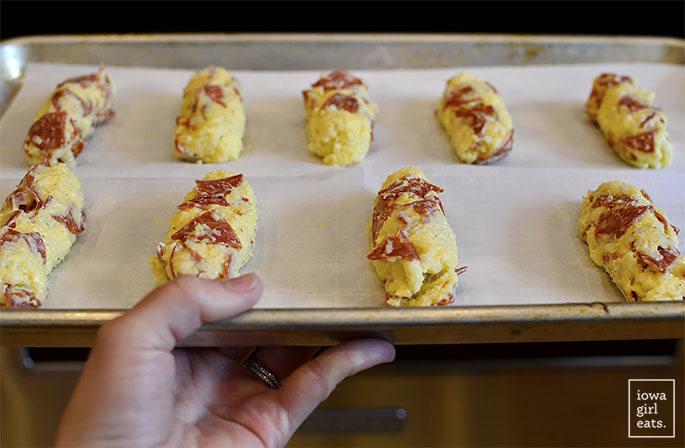
Step 4: Shape then bake.
Scoop 1/4 cup of the dough onto slightly wet hands then roll each portion into a 3-4″ log. Place them onto a parchment paper or silpat-lined baking sheet then cook one of two ways:
Oven Bake Method
Bake the Gluten Free Pizza Breadsticks for 8-10 minutes at 450 degrees or until golden brown, rotating the pan halfway through.
Air Fryer Method
Spray the basket of your Air Fryer VERY WELL with nonstick spray then place the breadsticks inside with 2″ between each one (you’ll need to cook them in batches.)
Air Fry at 390 degrees for 3-4 minutes or until golden brown.
Step 5: Serve immediately.
Dig in IMMEDIATELY for the best, most cheesy and fluffy experience – pizza sauce on the side, of course!
I hope you love these absolutely AMAZING Gluten Free Pizza Breadsticks – enjoy!

More Pizza-Inspired Recipes
- Chicken Crust Caesar Salad Pizza
- Pizza Fries
- Gluten Free Pizza Crust
- Pizza Chicken
- Pizza Pasta Bake
- Pizza Salad
- Mini Pizza Quinoa Bites

Equipment
Ingredients
- 1-1/4 cup tapioca flour/starch
- 1 teaspoon baking powder
- 1/2 teaspoon garlic powder
- 1/4 teaspoon heaping Italian seasoning
- 6 oz shredded mozzarella or Italian blend cheese, ~1-1/2 cups
- 1 cup pizza toppings, chopped pepperoni, sliced black olives, Italian sausage, etc.
- 2 eggs, whisked
- 1/4 cup butter, melted then slightly cooled
- warmed marinara or pizza sauce for dipping
Directions
- Preheat oven to 450 degrees then line a baking sheet with parchment paper or a silpat and set aside.
- Add tapioca flour, baking powder, garlic powder, and Italian seasoning to a large bowl then whisk slowly to combine. Add cheese and pizza toppings then whisk to combine. Add eggs and butter then switch to a wooden spoon and stir until mixture is thoroughly combined. Mixture will be slightly sticky but shouldn’t be impossible to work with – it will become less sticky after sitting for a couple minutes.
- Lightly wet hands then scoop 1/4 cup dough into your hands and roll into a 3-4″ log. Place onto prepared baking sheet then bake for 8-10 minutes, or until golden brown, rotating the pan halfway through. Serve with marinara or pizza sauce for dipping.
To cook using an AirFryer:
- Preheat to 390 degrees (or the closest setting to 390 degrees on your model of Air Fryer) then spray the basket very well with nonstick spray. Add pizza sticks to basket 2" apart (will need to cook in batches) then cook for 3-5 minutes or until golden brown. Serve immediately.
Notes
- I recommend Bob’s Red Mill Gluten Free Tapioca Flour.
- Tapioca starch is what gives the breadsticks their soft and stretchy texture so do not swap it out for a different starch, gluten-free baking flour blend, or all-purpose flour. The breadsticks will not turn out.
- To freeze: freeze the cooked then cooled Pizza Breadsticks on a baking sheet until frozen solid then transfer to a Ziplock freezer bag for up to 3 months.
- To reheat using the microwave: place frozen pizza breadsticks on a plate then cover with a paper towel. Microwave on 50% power for one minute or until heated through.
- To reheat using an Air Fryer: spray the basket very well with nonstick spray then cook for 2-3 minutes at 390 degrees or until heated through.
- Slightly adapted from Gluten Free Gobsmacked
Nutrition
Nutritional values are estimates only. Please read our full nutrition information disclaimer.


These are so good! Our family of three Celiacs had all but given up on enjoying a thick, chewy pizza experience but these definitely gave us our fix! We made them as a quick appetizer and the recipe is simple and quick. I wanted to add black olives instead of just pepperoni, but my family said no…next time I’ll make a batch just for myself with the olives :) We dipped them in pizza sauce straight out of the oven and they were 10/10. Thanks for highlighting this recipe!
I’m a black olive girl too. ;) Thrilled these were a hit with all your Celiacs – thank you so much for your feedback and recipe rating!
I’m wondering if we could use a cheese other than mozzarella. My daughter can handle most hard cheeses but mozzarella is tough on her system. Thoughts?
Hi Cari! You could try Monterey Jack or Fontina, if she can handle those?
Hi Cari,
We made them once with just colby-jack cheese as we were out of mozzarella and they were still delicious!
These are the best! I noticed some commenters asking about making them dairy free and I wanted to let them know that I have made them dairy free, and they were delicious! I have made them several times using the dairy free shreds I had in the fridge (Daiya, Simple Truth, and VioLife are the brands I have used) and they all worked perfectly. The “cheese” melted beautifully!
Oh good!! That is so helpful to know – thanks so much for your feedback, Lindsey!!
I am in charge of gluten free snacks for Thanksgiving evening. How do you think they would work if I made the dough in the morning and baked them several hours later so they are warm when we eat them?
Hi Denise! I worry about the dough drying out. I would bake in the morning then reheat in the microwave (place them on a plate then cover with a paper towel and microwave on 50% power until heated through) or AirFryer (spray basket with nonstick spray then cook for 2-3 minutes at 390 degrees or until heated through.) I hope that helps!
Absolutely delicious! I’m so impressed with the texture, it reminds me of Against the Grain products. Light and fluffy and so yummy!!
Awesome!! So glad you were pleased, Mindy!!
These were so good! Thank you!
I’m so glad you loved them, Samantha!!
These are absolutely delicious! My family & I loved them! They are exactly what I was hoping for. Thank you for sharing them!
Aww, I’m so thrilled to hear that, Sheri! Thank you so much for your feedback and recipe rating!
How are these cold? I’m looking for a pizza stick type dipper to make for my 3 year old that she can take to daycare. We send all of her food from home because the food they serve is pretty terrible quality, but want to be able to send something similar. Wish we could send them warm!
You know what, I’ve never eaten them cold – we always finish the batch!! I think they could be ok – maybe a little tough?
We ate some of ours cold and we still thought they were yummy!
Good to know – thanks Sheri!
Hi! Do you think these could be made without the cheese as just pizza breadsticks? my husband is GF, DF. Thanks!
Hi Penny! The cheese is actually what holds the breadsticks together so unfortunately this recipe doesn’t translate well to being DF!
My son LOVED these! Thank you so much
I’m so happy to hear that, Devin!! Thank you so much for your feedback and recipe rating!
This recipe is so good. My 11 year old requests it on a regular basis. I would highly recommend making it. I make sure we always have tapioca starch in the pantry now! Thank you for sharing this one with us!
Love, love, love to hear it, Christy!! Thank you so much for your feedback and recipe rating!
Will this work with df cheese?
Unfortunately not, Deb! Regular cheese is what helps hold the breadsticks together – df cheese doesn’t quite have that stretchy/sticky texture!
So easy and absolutely incredible! My teenagers, my husband, we all loved them.
Thrilled to hear it, Elizabeth!! Thank you so much for your feedback and recipe rating!